Additional fields for WP_Nav_Menu
In WordPress 5.4 there are new hooks that allow you to more flexibly customize the WordPress menu (WP Nav Menu). In particular, it's now possible to easily add custom (additional) fields to the WordPress Navigation menu.
We are talking about wp_nav_menu_item_custom_fields and wp_nav_menu_item_custom_fields_customize_template hooks. With their help you can now easily add your own arbitrary fields to the menu items both on the menu editing page in the admin-panel and in the Customizer panel.
In this post we will look at using the wp_nav_menu_item_custom_fields hook to add our own custom fields to menu items. Also consider plugins that allow you to do the same without writing any code.
Add fields to WP menu using PHP code
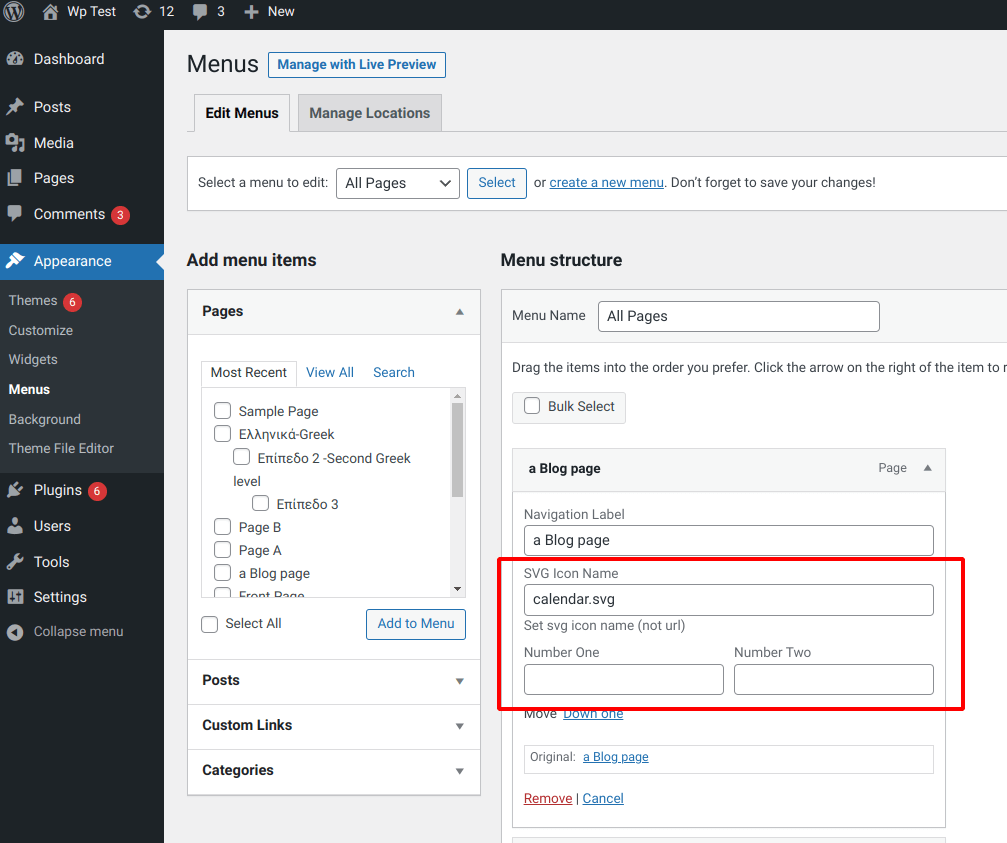
The code below uses two hooks to create a new _menu_item_svg_icon field in the WP nav menu:
- wp_nav_menu_item_custom_fields - allows you to display HTML code in the menu on admin panel page.
- wp_update_nav_menu_item - allows you to save the added fields in the menu item custom fields (recall that menu items are stored in wp_posts table and use standard posts custom fields).
Two hooks in code below are also used to handle the output of the created field. Here the field stores the name of the SVG icon file. When displaying the menu we add a placeholder {SVG} to the base HTML markup of the menu element and then replace it with a real SVG image.
<?php

final class WP_Nav_Menu_Custom_Fields {

	public static array $field_keys = [

		'_menu_item_svg_icon' => [
			'title' => 'SVG Icon Name',
			'desc' => 'Set svg icon name (not url)',
		],

		'test_number_field' => [
			'title' => 'Number One',
			'type' => 'number',
			'size' => 'thin', // thin | wide
			// 'desc' => 'some text',
		],

		'test_number_field_two' => [
			'title' => 'Number Two',
			'type' => 'number',
			'size' => 'thin', // thin | wide
			// 'desc' => 'some text',
		],

	];

	public static function init(): void {

		if( is_admin() ){
			add_action( 'wp_nav_menu_item_custom_fields', [ __CLASS__, 'add_fileds' ], 10, 2 );
			add_action( 'wp_update_nav_menu_item', [ __CLASS__, 'save_fields' ], 10, 2 );
		}
		// front
		else {
			add_filter( 'walker_nav_menu_start_el', [ __CLASS__, 'nav_menu_start_el' ], 10, 2 );
			add_filter( 'wp_nav_menu_args', [ __CLASS__, 'nav_menu_args' ] );
		}

	}

	public static function add_fileds( $item_id, $item ) {

		foreach( self::$field_keys as $meta_key => $data ){

			$value = get_post_meta( $item_id, $meta_key, true );
			$title = $data['title'];
			$type = $data['type'] ?? 'text';
			$size = $data['size'] ?? 'wide';

			$desc = empty( $data['desc'] ) ? '' : '<span class="description">'. $data['desc'] .'</span>';
			?>
			<p class="field-<?= $meta_key ?> description description-<?= $size ?>">
				<?= $title ?>
				<br/>
				<input class="widefat edit-menu-item-<?= $meta_key ?>"
					   type="<?= $type ?>"
					   name="<?= sprintf( '%s[%s]', $meta_key, $item_id ) ?>"
					   id="menu-item-<?= $item_id ?>"
					   value="<?= esc_attr( $value ) ?>"/>

				<?= $desc ?>
			</p>
			<?php
		}
	}

	public static function save_fields( $menu_id, $item_id ) {

		foreach( self::$field_keys as $meta_key => $data ){
			self::save_field( $menu_id, $item_id, $meta_key );
		}
	}

	private static function save_field( $menu_id, $item_id, $meta_key ) {

		if( ! isset( $_POST[ $meta_key ][ $item_id ] ) ){
			return;
		}

		$val = $_POST[ $meta_key ][ $item_id ];

		if( $val ){
			update_post_meta( $item_id, $meta_key, sanitize_text_field( $val ) );
		}
		else{
			delete_post_meta( $item_id, $meta_key );
		}

	}

	public static function nav_menu_start_el( $item_output, $post  ){

		$svg = $post->_menu_item_svg_icon ?: '';
		if( $svg ){
			$svg = get_svg( $svg );
		}

		return str_replace( '{SVG}', $svg, $item_output );
	}

	public static function nav_menu_args( $args ){

		if( empty( $args['link_before'] ) ){
			$args['link_before'] = '{SVG}';
		}

		return $args;
	}

}
After installing this code (create a file from this code and plug it into functions.php), you need to run it with this line in the functions.php file:
WP_Nav_Menu_Custom_Fields::init();
Now, when we go to the "Appearance > Menus" page of the admin panel, we will see new fields there:
Retrieving fields
To get the fields on the output, use the get_post_meta() function:
$field_value = get_post_meta( $item_id, $field_key, true );
Such code can be used for example in start_el() method when you create your class to handle menu output. Or in hooks, which change output of navigation menu.
Add fields to the menu using the Advanced Custom Fields (ACF) plugin
The very popular and versatile Advanced Custom Fields plugin again demonstrates its flexibility by allowing you to add custom fields to your WordPress menus.
After installing and activating the plugin, open it and click on 'Add New' to add fields. Select 'Menu Item' in the location rules. Follow the instructions and update the fields as needed.

After publishing a field, you can go to the WordPress menu from the admin area to see the new field you created. Pretty simple!
Let's add fields to the menu using the WP Menu Custom Fields plugin
The WP Menu Custom Fields plugin is a relatively new plugin that, as the name suggests, will help you add custom fields to your menu items. You can add custom text, image, shortcode or custom HTML.
Instead of creating custom menu items through a special plugin interface (as you do with Advanced Custom Fields), WP Menu Custom Fields adds editable options directly to any menu item in the admin menu edit area.
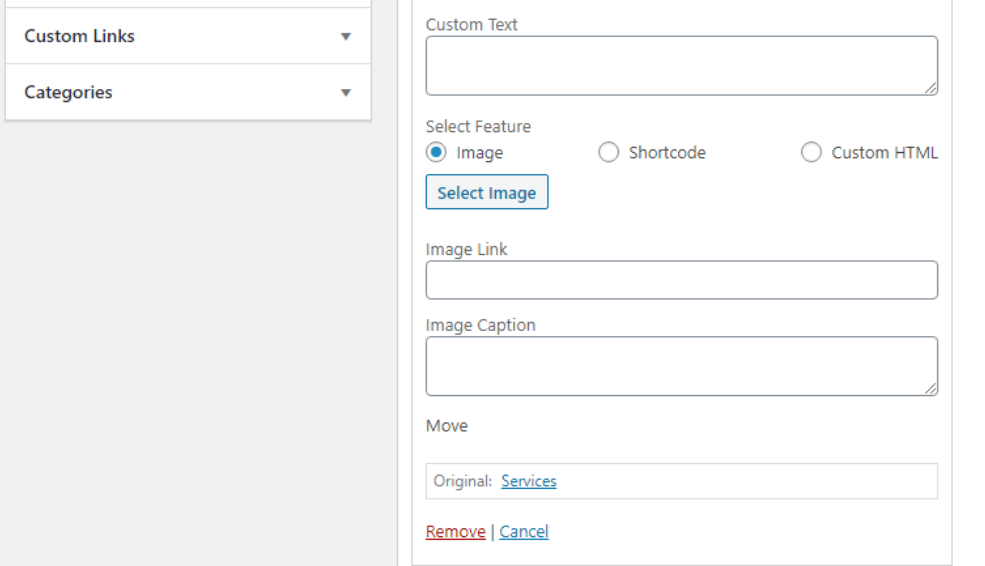
It is fairly easy to use and provides a convenient way to add custom fields and other content to menu items. The plugin documentation also provides plugin hooks that you can use to further customize the HTML generation of each feature.