HTTPS for OpenServer (SSL certificate)
When developing a site locally, it is convenient to use the https protocol for sites so that it exactly matches how the site operates in reality. This can in some cases save time on fixing SSL-related errors.
Below we will figure out how to configure an SSL connection for OpenServer.
Method 1
#1 Create a .bat file
C:\OpenServer\userdata\config\cert_files\generate-DOM-CERT.bat with the following code (the file name can be anything):
: Version 1.0
: Author Kama (wp-kama.ru)
@echo off

: parameters
set DOM=demo.ru
set DOM_KEY=demo
set APACHE_VER=Apache_2.4-PHP_7.2-7.3-x64

: create .txt config file
set config_txt=generate-temp-config.txt
(
	echo nsComment = "Open Server Panel Generated Certificate"
	echo basicConstraints = CA:false
	echo subjectKeyIdentifier = hash
	echo authorityKeyIdentifier = keyid,issuer
	echo keyUsage = nonRepudiation, digitalSignature, keyEncipherment
	echo.
	echo subjectAltName = @alt_names
	echo [alt_names]
	echo DNS.1 = %DOM%
	echo DNS.2 = www.%DOM%
) > %config_txt%

mkdir %DOM_KEY%

set OSAPACHE_DIR=%~dp0..\..\..\modules\http\%APACHE_VER%
set OPENSSL_CONF=%OSAPACHE_DIR%\conf\openssl.cnf
"%OSAPACHE_DIR%\bin\openssl" req -x509 -sha256 -newkey rsa:2048 -nodes -days 5475 -keyout %DOM_KEY%\%DOM_KEY%-rootCA.key -out %DOM_KEY%\%DOM_KEY%-rootCA.crt -subj /CN=OSPanel-%DOM_KEY%/
"%OSAPACHE_DIR%\bin\openssl" req -newkey rsa:2048 -nodes -days 5475 -keyout %DOM_KEY%/%DOM_KEY%-server.key -out %DOM_KEY%\%DOM_KEY%-server.csr -subj /CN=%DOM_KEY%/
"%OSAPACHE_DIR%\bin\openssl" x509 -req -sha256 -days 5475 -in %DOM_KEY%\%DOM_KEY%-server.csr -extfile %config_txt% -CA %DOM_KEY%\%DOM_KEY%-rootCA.crt -CAkey %DOM_KEY%\%DOM_KEY%-rootCA.key -CAcreateserial -out %DOM_KEY%\%DOM_KEY%-server.crt
"%OSAPACHE_DIR%\bin\openssl" dhparam -out %DOM_KEY%\%DOM_KEY%-dhparam.pem 2048

del %DOM_KEY%\%DOM_KEY%-server.csr
del %DOM_KEY%\%DOM_KEY%-dhparam.pem
del %DOM_KEY%\%DOM_KEY%-rootCA.srl
del %config_txt%

pause
Now, you need to adjust the following three parameter values:
- DOM — the domain for which the certificate is created
- DOM_KEY — what the folder with certificates will be named and the prefix of the certificate files. Specify here the domain without the zone or a shortened domain name so you understand which domain the current certificate belongs to.
- APACHE_VER — the name of the Apache server folder from
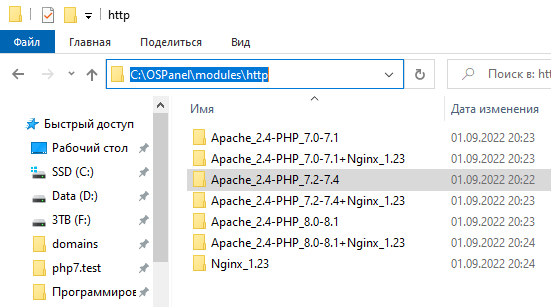
C:\OpenServer\modules\http\. The OpenSSL library from this server will be used to create the certificate. There are several such folders, you need to choose the one that matches the server you have configured.
In my case it is Apache_2.4-PHP_7.2-7.4:
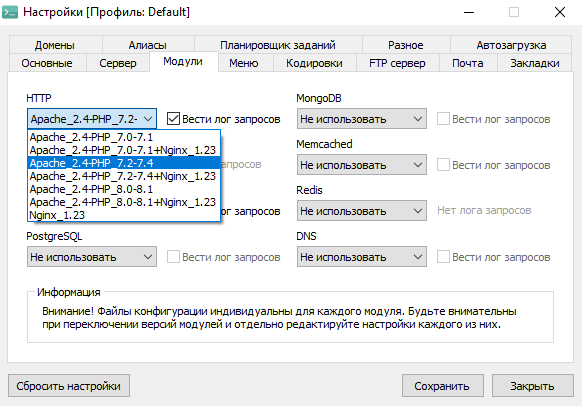
Just in case, you can go to the folder C:\OSPanel\modules\http and check whether the name matches the folder in the settings.
Important! There must be no spaces between the = in the parameters!
// Correct
set DOM_KEY=demo

// Incorrect
set DOM_KEY= demo
set DOM_KEY = demo
To create another certificate for a domain, just open this file, change the parameters, and run it.
#2 Run the file generate-DOM-CERT.bat (as a normal user, NOT as administrator!)
To run, double-click the file. The file will create the domain folder (parameter DOM_KEY) and the certificate files inside it.
#3 Add the created certificate to the Windows certificate store
To do this, run the file DOM_KEY/DOM_KEY-rootCA.crt.
IMPORTANT! On some versions of Windows, you must run the file with administrator rights! If there is no "Run as administrator" option in the context menu, open PowerShell as administrator and run the certificate file from there. To do this, press Win+Q, type powershell in search, right-click and choose Run as administrator.
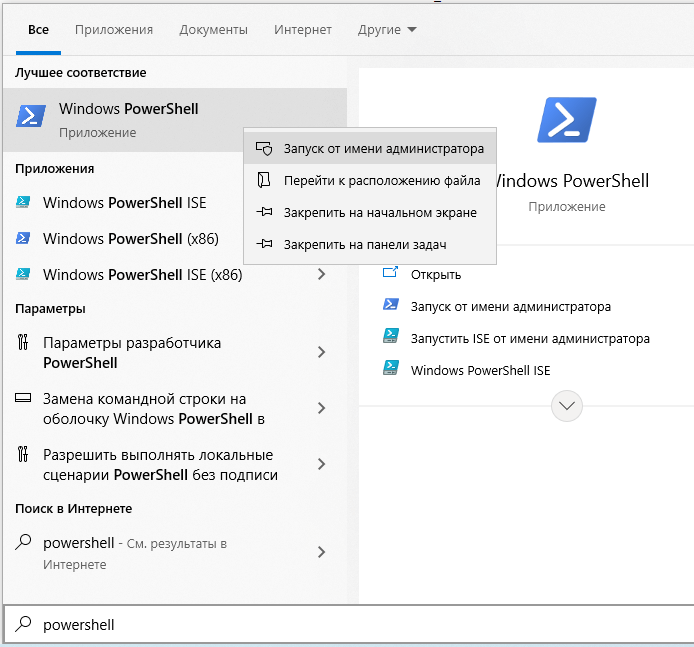
Now, run the file:

Then: Install Certificate > Current User > Trusted User Sertificate > Local Computer
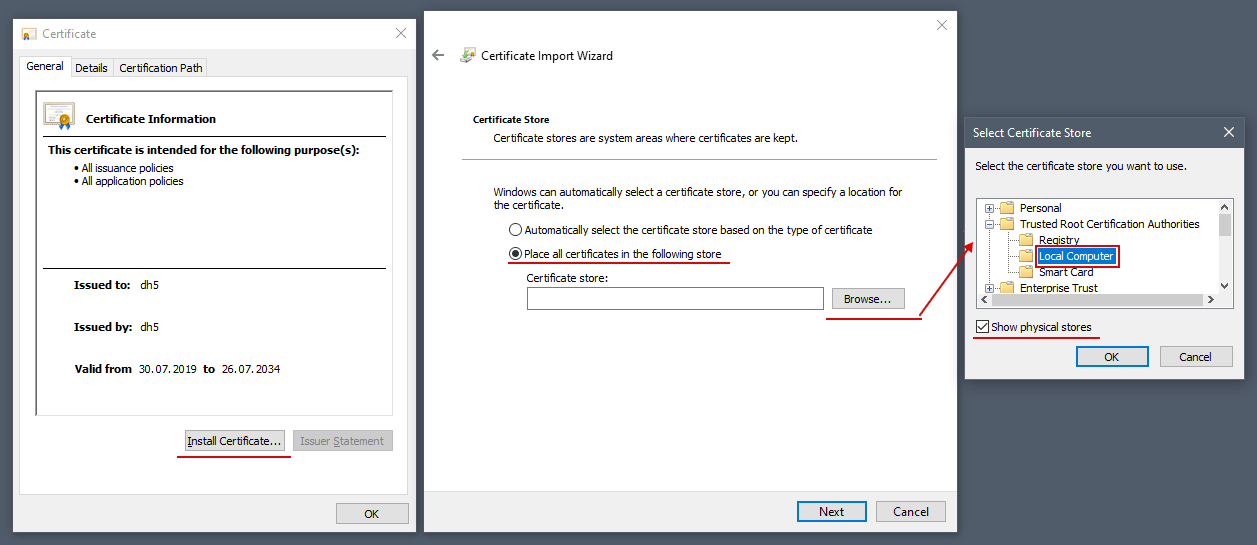
If there is no local computer, select Enterprise.
#4 Copy the Apache configuration file
C:\OpenServer\userdata\config\Apache_2.4-PHP_7.2-7.3-x64_vhost.conf to the website root folder (where the wp-config.php file is located).
#5 Edit the copied configuration file
Apache_2.4-PHP_7.2-7.3-x64_vhost.conf — adjust the paths to the created certificate files.
The file should look like this code:
<VirtualHost *:%httpport%>

	DocumentRoot    "%hostdir%"
	ServerName      "%host%"
	ServerAlias     "%host%" %aliases%
	ScriptAlias     /cgi-bin/ "%hostdir%/cgi-bin/"

</VirtualHost>

<IfModule ssl_module>

	<VirtualHost *:%httpsport%>

		DocumentRoot    "%hostdir%"
		ServerName      "%host%"
		ServerAlias     "%host%" %aliases%
		ScriptAlias     /cgi-bin/ "%hostdir%/cgi-bin/"

		SSLEngine       on

		SSLCertificateFile     "%sprogdir%\userdata\config\cert_files\DOM_KEY\DOM_KEY-server.crt"
		SSLCertificateKeyFile  "%sprogdir%\userdata\config\cert_files\DOM_KEY\DOM_KEY-server.key"

	</VirtualHost>

</IfModule>
#6 Done!
Reload OpenServer and possibly the browser.
Method 2: a simpler and faster alternative
#1 Install mkcert utility
The official repository has instructions for different systems, but since we want certificates for OpenServer, we are on Windows. To install on Windows you will first need an installed Chocolatey or Scoop. Depending on the chosen package manager (I use Chocolatey) run in the terminal one of the following commands:
#Chocolatey
choco install mkcert
#Scoop
scoop bucket add extras
scoop install mkcert
After installation you can verify success by running mkcert. Then run:
mkcert -install
#2 Create certificates for domains
- Go to the directory
C:\OSPanel\userdata\config\cert_files(your path may differ) and open a terminal from there. - Run the command
mkcert %domain%. You can specify all the domains you need separated by spaces, for examplemkcert example.local wpsite.develop test.local myblog.localhost - Generated certificate files will appear in the directory
#3 Apply changes to the server configuration
-
Go up one level to the directory
C:\OSPanel\userdata\configand open in an editor the file of the active Apache module’s vhost configuration%module version%_vhost.conf, for me it is, for example,Apache_2.4-PHP_8.0-8.1_vhost.conf -
Find the line that begins with
SSLEngine onSSLEngine on #Protocols http/1.1 #Header always set Strict-Transport-Security "max-age=94608000" #SSLCACertificateFile "" #SSLCertificateChainFile "" SSLCertificateFile "%sprogdir%/userdata/config/cert_files/server.crt" SSLCertificateKeyFile "%sprogdir%/userdata/config/cert_files/server.key"
and modify it as follows
<IfFile "%sprogdir%/userdata/config/cert_files/%host%.pem">
	SSLEngine       on
	#Protocols      http/1.1
	#Header         always set Strict-Transport-Security "max-age=94608000"
	#SSLCACertificateFile    ""
	#SSLCertificateChainFile ""
	SSLCertificateFile       "%sprogdir%/userdata/config/cert_files/%host%.pem"
	SSLCertificateKeyFile    "%sprogdir%/userdata/config/cert_files/%host%-key.pem"
</IfFile>
- It remains to restart the server and done! In the future, to add new domains, simply repeat the second step and restart the server.