AJAX Simply
A plugin for the simplest possible creation of AJAX requests in WordPress.
I described in detail how to use AJAX in WordPress in the same-named article. Using hooks to create an AJAX request in WordPress is clumsy: you have to create a function every time and “hook” it onto a hook. Also, AJAX requests are often done for the front end, and in this case you need to hook the function onto two hooks. In addition, you have to account for a lot of small things that, during development, take time and force you to focus on trivial things.
Why hooks are used for AJAX in WP is clear: so that functions run at the end, and have access to everything that exists in plugins and themes. But despite this, AJAX in WordPress can be significantly simplified and made more convenient. AJAX Simply does exactly that, as a result working with AJAX in WordPress is simplified many times over.
The core of the plugin consists of two small files .php and .js.
Usage example
Let’s imagine that we installed AJAX Simply and we have a form that needs to be processed via AJAX.
To do this, add an onsubmit attribute like this:
<form class="my-form" onsubmit="ajaxs( 'ajaxs_php_function', this ); return false;">

	<input type="text" name="my_text" value="value of text field" />
	<textarea name="my_textarea">text in textarea</textarea>
	<input type="file" name="my_file" />

	<input type="submit" value="Submit" >
</form>
Now create a PHP function that will process the AJAX request:
// request handler function.
// ajaxs_ - this is a mandatory prefix.
function ajaxs_php_function( $jx ){

	// will show an alert with the text `value of text field`
	$jx->alert( $jx->my_text );

	// will print to the console `text in textarea`
	$jx->console( $jx->my_textarea );

	// will print to the console the array of uploaded file data, via print_r()
	$jx->log( $jx->my_file );

	// clear the form data
	$jx->reset_form( '.my-form' );
}
The function can be inserted anywhere, for example in the theme file functions.php.
Done! Now after clicking the “Submit” button you will see:
- in the browser an alert with the text
value of text field— via$jx->alert(). - in the browser console there will be a line with
text in textarea— via$jx->console(). - in the browser console there will be the data of the passed file (as an array) — via
$jx->log. - the form data will be cleared — via
$jx->reset_form().
That is, ajaxs() will gather and send the form data (all fields). We will receive them in the PHP function and can do anything with them, while in PHP we can say to the browser to display an alert, console messages, and clear the form.
Such code will work both in the WP admin and on the front end.
IMPORTANT: Since version 1.8, the plugin by default runs on vanilla JS (without jQuery dependency).
Legacy jQuery script remains available for compatibility and is enabled as a separate option in the settings.
When upgrading from older versions, the legacy jQuery mode will be used.
See more examples here.
Video: example of creating an AJAX contact form on a site
What exactly does the plugin simplify?
The plugin does not create something new; it “wraps” the entire AJAX work in its own logic and greatly simplifies it. Send–process–receive: it’s all straightforward! This means that in case of need you can easily reuse the basic AJAX request logic in WordPress — the usual hooks and the extra variables of the AJAX request itself.
What you can forget about:
-
Forgetting about hooks and specify the handler function directly from the JS file. You can also specify a class method, static or public.
-
Forgetting about global variables $_POST, $_GET and conveniently obtaining the data sent to the server in a single format, without needing to remember which method the data was sent by and what data should be escaped.
-
Forget about the inconveniences of sending data from the server back to JS: they can be arrays, objects, numbers, strings, etc. And all of this with the correct data types.
-
Forget about the complexity of collecting data from HTML forms or an HTML element with form fields: pass the HTML element containing the form fields, and values of all fields will be collected automatically. That is, specify the form and receive a ready data object for sending, which can also be extended.
-
Forget about the request URL that constantly needs to be passed when creating an AJAX request, and about having to define it first on the frontend.
-
Forget about the difficulties when uploading files via AJAX.
-
Forget about the hassle of debugging. For example, you can output data to the browser console directly from PHP (see $jx->console()).
-
Forget about the difficulty of viewing PHP errors. Now with WP_DEBUG enabled, errors of any level, including fatal ones, you will see in the browser console.
-
Forget about the need to include die or exit at the end of the PHP handler function.
-
Forget about the need to protect requests with a nonce code. The plugin does this protection automatically. This option needs to be enabled separately (see notes).
- Code related to AJAX across the project will be shorter and wrapped in a documentation-oriented structure.
I want to point out that the plugin does not create any extra load, as might seem from its functionality. Everything is well thought out and runs fast! The only thing it does is include +1 JS file of 10KB (4KB gzipped).
Moreover, if you create your own file that handles AJAX requests for the front end, the load on requests will be slightly reduced (see notes).
Now let's move to the AJAX Simply documentation.
ajaxs()
In JS you should use the function ajaxs().
action is the only mandatory parameter.
// POST request
ajaxs( action );

// GET request
ajaxsGET( action );

// request with parameters
ajaxs( action, data );

// All possible parameters
ajaxs( action, data, doneFunc, alwaysFunc, failFunc );

// The data parameter can be omitted
ajaxs( action, doneFunc, alwaysFunc, failFunc );

// Since version 1.8.0 (vanilla mode) you can pass an object of callbacks
ajaxs( action, data, { done, fail, always } );
Functions ajaxs() and ajaxsGET() return an object XMLHttpRequest with additional methods .done(), .fail(), .always() and Promise-style methods .then(), .catch(), .finally(). Example:
ajaxs( 'my_function', { foo:'bar' } )
	.done( function( body, status ){
		// successful server response
	} )
	.always( function( xhr, status ){
		// any server response
	} )
	.fail( function( error, status, xhr ){
		// error in server response
	} )
Up to version 1.8.0 (jquery mode):
-
The functions ajaxs() and ajaxsGET() return what jQuery.ajax() returns, so you can apply methods:
.done(),.fail(),.always(),.then(). - The order of parameters for fail()
.fail( function( xhr, status, error ){} )
If you specify the parameter doneFunc and the .done() method, first doneFunc will be executed, then .done(). The same applies to alwaysFunc and .always(), failFunc and .fail().
Parameter descriptions
- action(required)
Name of the PHP function or class method that will process the AJAX request.
Examples:
ajaxs( 'ajaxs_php_function' )
ajaxs( 'AJAXS_Myclass::method' )
ajaxs( 'Myclass::ajaxs_method' )
ajaxs( '\\namespace\\AJAXS_Class::method' )
ajaxs( '\\namespace\\Myclass::ajaxs_method' )
- The prefix
ajaxs_in the name is mandatory. - If you use the prefix
ajaxs_priv_, the function will be triggered only for authorized users. - If a class method is specified, it must be static.
- The prefix can be written in uppercase: AJAXS_Myclass::method.
For backward compatibility, the plugin works on standard WordPress hooks:
(action) will be replaced with the value specified in this parameter action. For example, if you specify ajaxs_php_function in action, one of the hooks will fire: wp_ajax_nopriv_php_function (for non-authenticated) or wp_ajax_php_function (for authenticated).
- The prefix
- data
Data to be sent along with the AJAX request. If there is no data, this parameter can be omitted. You can specify:
- An object with data.
- An HTML (DOM) element.
- An object with data, among which there is an HTML (DOM) element.
Let’s look at all options in detail:
-
{ key: 'val' }
An object with data (key: value).ajaxs( 'php_func', { my_key: 'my_val', num: 1 } ); -
HTML element (DOM element)
If you pass an HTML element, for example an HTML form, values of all fields input, select, textarea inside the specified element will be gathered. Fields must have anameattribute: it will become the key.Any element containing form fields can be passed; it does not have to be a <form> element; it can be a <div> or other.
If you pass the form field itself, for example <input>, then the value of that field will be added to the data. It must also have a
nameattribute, which becomes the key. Alternatively, the field can have an attributedata-nameoridand the value in thevalueattribute.Example:
var element = document.getElementById('my_form'); ajaxs( 'php_func', element ); -
jQuery element
Exactly the same as passing an element, but as a jQuery object.
Works if jQuery is loaded on the page.var $element = jQuery('#my_form'); ajaxs( 'php_func', $element ); -
Combination - parameters and HTML elements
You can pass a JS object that contains inside it HTML element(s). Then the request will include the data from the object and the data from the fields of the HTML element. If keys collide, data will overwrite each other in the order of priority...var data = { my_key : 'my_val', foo : document.querySelector('.my_form') } ajaxs( 'php_func', data );fooin this case is not used anywhere and is needed only for object integrity.
Real key names will be taken from thenameattribute of the fields inside the element '.my_form'. -
Files and file input field type: input[type="file"]
Files passed in the data will be processed and in PHP we will get the standard $_FILES array.For files everything described for the "HTML element" variant applies. Namely:
-
A file field can be inside the passed element (part of a form).
-
A file field can be passed as a separate element. i.e. pass the file input itself.
-
You can combine: pass a data object that includes an HTML element with a file field.
-
File data can be specified directly in the data object:
var fileElement = document.querySelector('input[type="file"]')
var data = {
	my_key : 'my_val',
	myfile : fileElement.files[0] // first file
}
ajaxs( 'my_function', data );
-
-
Parameter data.ajax
Allows you to specify additional AJAX request parameters.If in the data you specify a key ajax and in its value an object with data keys: values, then these parameters become the AJAX request parameters.
Supported parameters:
url,method,data,beforeSend( xhr, jx ),xhrFields.Example:
data = {
	my_key : 'my_val',                            // custom value
	foo    : document.querySelector('.my_form'),  // all fields of form my_form
	ajax   : {
		method     : 'PUT',
		beforeSend : function( xhr, jx ){
			xhr.setRequestHeader( 'X-Request-Source', 'ajax-simply' );
		},
		xhrFields  : {
			timeout      : 15000,
			responseType : 'json'
		}
	}
}
ajaxs( 'my_func', data );
For vanilla mode (after v1.8) jQuery-specific parameters (
dataType,processData,contentType,headers) are not used.In legacy jQuery mode (before v1.8) a old jQuery script is used and the corresponding jQuery ajax options - jQuery.ajax.
-
Parameter data.uploadProgress
Since version 1.2.1. Allows you to get the file upload progress. You must specify a function in this parameter that will dynamically receive the file upload percentage as the file is uploaded in the browser. This percentage can be displayed in an HTML element to inform the user about the upload progress.data = { foo : document.querySelector('.my_form'), // all fields of form my_form uploadProgress : function( percentComplete ){ document.querySelector('.file_progress').textContent = percentComplete + '%'; } } ajaxs( 'my_func', data ); -
Parameter data.largeFileError
Since version 1.2.8. Allows intercepting an error when uploading a file larger than the server allows. For example, server settings may allow a 10MB file, but 11MB is uploaded. In this case the user will see an alert() with the error. This parameter allows intercepting this message and displaying it in some HTML block for errors. Example:var form = document.querySelector('.my_form'); var upProgress = document.querySelector('.up_progress'); var errorMsg = document.querySelector('.error_msg'); var data = { foo : form, uploadProgress: function(percent){ upProgress.textContent = percent + '%'; }, largeFileError: function( curBigSize, allowedSize, filename ){ if( filename ) var msg = 'Error: large file size: '+ curBigSize +' (allowed '+ allowedSize +')<br>File: '+ filename; else var msg = 'Error: large amount of data: '+ curBigSize +' (allowed '+ allowedSize +')'; errorMsg.innerHTML = msg; errorMsg.style.display = 'block'; // show } }; ajaxs( 'Add_Post::upload_files', data, function(res){ });Maximum allowed sizes can be changed in the plugin settings or via filters: ajaxs_post_max_size and ajaxs_upload_max_filesize. Filters should return a number in bytes or in short form like 500K, 10M, 1G.
- doneFunc
Function that will run on a successful server response to the AJAX request.
Will receive parameters: response, status, xhr.
As a parameter, the function will receive what the PHP function handler returns — it can be: number, string, true/false, object (simple or associative array).
Example:
ajaxs( 'my_function', data, function( response, status, xhr ){ // for numbers, strings, true/false response; // for simple arrays response[0]; response[1]; // for associative arrays response.my_key; response['my_key']; });- alwaysFunc
Function that always runs — whether a response was returned or not. It’s convenient to hide the “loader” that was shown to the user before sending the AJAX request...
Will receive the following parameters: xhr, status.
ajaxs( 'my_function', data,
	// success function
	function( result ){},
	// always function
	function( xhr, status ){},
);
If you need to skip this function but define the next function: failFunc — error of the response, then specify here null or false.
- failFunc
Function that will run if the request fails. For example, when the server does not respond, or returns a 500 response, or when the returned data could not be retrieved (returned not a json string) etc.
For vanilla mode (after v1.8) will receive parameters: error, status, xhr.
For legacy jQuery mode (before v1.8) the order is old: xhr, status, error.
ajaxs( 'my_function', data,
	// success function
	function( result ){},
	// always function
 null,
	// error function
	function( error, status, xhr ){
		alert( status +': '+ error );
	}
);
PHP
The function that handles the AJAX request must be named:
- ajaxs_(action)( $jx ) - for all users.
- ajaxs_priv_(action)( $jx ) - only for authorized users.
- Names of PHP-class methods see above, in the description of the action parameter.
The PHP function receives one parameter $jx.
In $jx->data are all data received from JS.
Also you can access the data directly via $jx->my_name — this is the same as $jx->data['my_name']. When accessed directly, the type is converted, for example a string that looks like a number '5' will become the integer 5. Other useful conversions are also done.
You can create the function anywhere; it is called at the very end: after WP is loaded — after all plugins, themes, and initialization of everything. So, for example, you can define it in MU-plugins, in a plugin file, in the theme file functions.php, or anywhere else.
Getting data in PHP
Suppose in JS we sent data like this:
var data = {
	color : 'Green',
	item  : 'Apple',
	image : document.querySelector('input[name="item_image"][type="file"]')
};

ajaxs( 'my_func', data, function( response ){
	// handle the response
} );
Now, we receive and process the data in PHP:
<?php
function ajaxs_my_function( $jx ){
	// $jx is a PHP object

	// $_POST, $_GET contain all request data in its original form,
	// but we don't need them!
	// All data received from JS is in the variable (escaping is removed here):
	$jx->data; //> array( color => Green, item => Apple )

	// individual data item
	$color = $jx->data['color']; //> Green
	$item  = $jx->data['item'];  //> Apple

	// data from JS file
	$image = $_FILES['item_image']; //> array of file data

	// MAGIC -----
	// data can be accessed directly:
	$jx->color;      //> Green
	$jx->item;       //> Apple
	$jx->files;      //> array of all files, also $_FILES, but with added index 'compact'.
					 // 'compact' is created for convenience, when multiple files are passed they are gathered in groups in compact.
					 // compact added in version 1.1.9
	$jx->item_image; //> array of file data
	$jx->item_image['compact']; //> array of data for files
								// when uploading multiple files at once (multiple)
								// in the 'compact' index is stored an array of these files in a convenient format - each file
								// is a separate array with keys: name, type, tmp_name, error

}
Returning data in PHP (server response)
PHP function can simply print to screen (echo) or return (return) any value (array/string/number/true/false). ajaxs() will smartly obtain these data whether it is a number, string, array, or object.
In addition to the returned data you can use special methods. For example, the method $jx->reload(), which will instruct the browser to reload.
The code below shows all possible return data variants.
<?php
function ajaxs_my_function( $jx ){

	// METHODS of the $jx object -----

	// $jx has special methods. For example:
	// tells JS to create an alert
	$jx->alert( $jx->color );

	// tells JS to output data to the console
	$jx->console( $jx->item ); // can also be written as: $jx->log( $jx->item );

	// tells JS (the browser) to reload the page after 1 second
	$jx->reload( 1000 );

	// SERVER RESPONSE -----

	// You can simply return any value: array/string/number/true/false
	// then JS will receive it as is. Arrays will be received as objects.
	return array( 'color' => $jx->color );
	return array( 'color', $jx->color );
	return "Color: $jx->color"; // string
	return 69;                 // number
	return true;               // boolean

	// Response via output to screen -----
	// You can output a string to the screen and it will be returned
	// to the JS function as a string - similar to return.
	echo "Color: $jx->color";
	// or output the string like this
	?>
	<div class="foo">Text</div>
	<?php

	// Response with php script termination -----
	// Inside the function you can use: die, exit and wrappers for them.
	// If you do not use termination, ajaxs will do it itself by the end of the function.
	die( 'i am a free string!' );      // not recommended!
	wp_die( 'i am a free string!' );   // recommended!
	$jx->success( 'success text' ); // Analog of wp_send_json_success( 'success text' );
	$jx->error( 'error text' );      // Analog of wp_send_json_error( 'error text' );
}
Methods of the $jx object in a PHP function
The methods below can be used in the PHP function handler. Using some of them you have already seen above in examples.
- $jx->success( $data = null )
- $jx->done( $data = null )
- One-time - terminates PHP with die!
Sends an object of a successful execution and terminates PHP using die(). Analog of WP function wp_send_json_success().
As a result, JS will receive:
{
	success : true,
	ok      : true,  // since version 1.1.7 also equals success
	error   : false, // since version 1.1.7
	data    : DATA   // any data from PHP: string/number/array/true/false...
}
Important: terminates PHP and any code after $jx->success() will NOT run!
$jx->done(). Since version 1.1.7, for convenience you can use $jx->done() instead of $jx->success().
- $jx->error( $data = null )
- One-time - terminates PHP with die!
Sends an error object and terminates PHP using die(). Analog of WP function wp_send_json_error().
As a result, JS will receive:
{
	success : false,
	ok      : false, // since version 1.1.7 equals success
	error   : true,  // since version 1.1.7
	data    : DATA   // any data from PHP: string/number/array/true/false...
}
Important: terminates PHP and any code after $jx->error() will NOT run!
Since version 1.3.0 you can pass a WP_Error object in the $data parameter of $jx->done($data) or $jx->error($data); it will be processed. The $data will end up as a string with all error messages that were in the WP_Error object. $jx->done() will automatically become $jx->error() because there is an error in the data...
- $jx->refresh( $delay = 0 )
- $jx->reload( $delay = 0 )
- Reusable - overwrites data from the previous call.
“Tells” JS to reload the page from which the AJAX request was sent.
In $delay you can specify a delay in milliseconds: 1000 ms = 1 second.
- $jx->redirect( $url, $delay = 0 )
- Reusable - overwrites data from the previous call.
“Tells” JS to navigate to the page specified in $url. The URL is sanitized with wp_sanitize_redirect().
In $delay you can specify a delay in milliseconds: 1000 ms = 1 second.
- $jx->console( $data )
- $jx->log( $data )
- Reusable - appends to data from the previous call.
“Tells” JS to output the specified data to the console.
In $data you can pass any data: string/number/true/false/array/object. Arrays and objects will be shown using print_r().
You can pass as many parameters as you like, separated by commas:
$jx->log( $data, $data2, ... );
In this case (since version 1.4.0) the console data will be grouped (console.group()).
The group title can be set by passing it as the first parameter, add a string starting with :::
$jx->log( '::Group title', $data, $data2, ... );
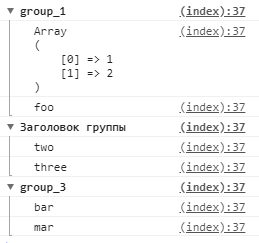
$jx->log() is an alias of $jx->console().
- $jx->dump( $data )
- Reusable - appends to data from the previous call.
Also like console(), but the specified data are output in the format of var_dump().
You can pass as many parameters as you like: $jx->dump( $data, $data2, ... );
- $jx->alert( $data )
- Reusable - appends to data from the previous call.
- Also like console(), but we will get an alert in the browser.
- $jx->reset_form( $selector )
- Reusable - appends to data from the previous call.
- Clears the form data. The form to be cleared is selected by the provided selector.
- $jx->trigger( $event, $selector = false, $args = array() )
- Reusable - appends to data from the previous call.
Triggers the specified in
$eventJS event on the element specified in$selector. In$argsyou can pass data that will be passed to the function handling the event.The selector can be any CSS-compatible selector:
#myid,.myclass, etc.If the selector is not provided, the event will be sent to
document(like a nativeEventorCustomEvent).Example. After processing the AJAX request, we need to simulate a click on the
.mylinklink (theclickevent):function ajaxs_php_function( $jx ){ $jx->trigger( 'click', '.mylink' ); }- $jx->call( $func_name, $param1, $param2, ... )
- Reusable - appends to data from the previous call.
“Tells” JS to call the function specified in
$func_name. The function must be in the window scope. For example, if we specifyfunctionName, the functionwindow.functionName( $param1, $param2 )will be called.In
$func_nameyou can indicate the prefixwindow.for clarity. E.g.window.functionNameis equivalent tofunctionName.$func_namecan be a property of an object nested under window: e.g.window.myObject.functionNameis equivalent tomyObject.functionName.- $jx->jscode( $code )
- $jx->jseval( $code )
- Reusable - appends to data from the previous call.
“Requests” JS to execute the specified in $code JS code. Code must be written according to all JavaScript rules.
$jx->jseval('alert("Executed!");');Alias $jx->jscode( $code ) added in version 1.4.4
- $jx->html( $selector, $html, $method )
- Reusable - appends to data from the previous call.
Inserts the specified HTML code into the specified element.
-
$selector(string)
Selector to search for the element in the DOM tree of the document. You can specify a CSS selector like:#myid,.myclass... -
$html(string)
The HTML code that will be inserted into the found element. - $method(string) (since version 1.4.3)
Defines which method to use to process the specified HTML. For example you can append to existing HTML by using the method 'append'. Possible values:html(default)appendprependbeforeafterreplace
-
- $jx->append( $selector, $html )
- $jx->prepend( $selector, $html )
- $jx->before( $selector, $html )
- $jx->after( $selector, $html )
- $jx->replace( $selector, $html )
prepend/append- adds the specified HTML to the beginning or end of the specified block.before/after- adds the specified HTML before or after the specified block.replace- replaces the specified block with the specified HTML code.All these methods are wrappers around the method $jx->html() with the third parameter $method. Since version 1.4.3.
- $jx->remove( $selector )
- Removes HTML elements by the specified selector. Since version 1.6.0.
- $jx->hide( $selector )
- Hides HTML elements selected by the specified selector. Adds the style
display:none. Since version 1.6.0. - $jx->show( $selector )
- Shows HTML elements selected by the specified selector. The
display:property is reset. Since version 1.6.0.
Ajax Simply events
Catch moments before or after performing an AJAX request using events that fire every time when the function ajaxs() or ajaxsGET() is started.
Vanilla JS (default mode)
// fires right before the request
document.addEventListener( 'ajaxs_start', ({ detail: { data, jx } }) => {} );

// after getting a response: always fires: on success or error
document.addEventListener( 'ajaxs_always', ({ detail: { data, jx, xhr, status } }) => {} );

// after getting a response: successful response
document.addEventListener( 'ajaxs_done', ({ detail: { data, jx } }) => {} );

// after getting a response: unexpected response, error
document.addEventListener( 'ajaxs_fail', ({ detail: { data, jx, xhr, status, error } }) => {} );
Legacy jQuery mode (compatibility)
// For legacy script (before v1.8)
jQuery(document).on( 'ajaxs_done', function( event, data, jx ){
	console.log( data, jx );
} );
In vanilla mode you can also attach a jQuery handler, but you need to get the data from event.originalEvent.detail:
jQuery(document).on( 'ajaxs_done', function( event ){
	const { data, jx } = event.originalEvent.detail;
	console.log( data, jx );
});
Parameters:
event- native event object (Event/CustomEvent).-
event.detail.data- object with AJAX request parameters, contains the following keys:{ action: 'string', // action key origin_data: mixed, // what was passed in ajaxs('...', data) - as is ..., // all other payload data (collected from the form) } event.detail.jx- the parameters of the AJAX request.event.detail.status- string, server response status.event.detail.error- error message.event.detail.xhr- AJAX request object. See XMLHttpRequest.
Events fire AFTER the callbacks that are defined as parameters of ajaxs(). For example, ajaxs( 'func', function(){} ).
In vanilla mode, events also fire after the .done(), .fail(), .always() chains and Promise handlers.
Example of using events
Suppose we have a loader that should be shown when any AJAX request is sent and hidden when any response is received (successful or not):
document.addEventListener( 'ajaxs_start', ({ detail: { data } }) => {
	// show loader
});

document.addEventListener( 'ajaxs_always', ({ detail: { data } }) => {
	// hide loader
});
Now when writing JS code you won’t need to constantly turn the loader on and off. Set it once and forget it - very convenient!
Additional capabilities
PHP function jx()
This function is very convenient for debugging the logic that runs in the handler!
If the handler uses other functions and you need access to the current $jx object from them, you can obtain it via the function jx(). For example:
function ajaxs_my_func( $jx ){
	$foo = my_func_help();
}
function my_func_help(){
	$data = array('needed data');

	// output $data to the console
	jx()->console( $data );
}
jx() has saved me many times: very convenient for debugging. For example, publishing a post via ajax and something goes wrong. I open the WP core code, in the function wp_insert_post(), and there I use jx()->log( $myvar ) to see what is currently in the variable $myvar.
PHP function doing_ajaxs() - check that an AJAX Simply request is being executed
To run code only when an AJAX Simply request is happening, use the PHP function doing_ajaxs():
if( doing_ajaxs() ){
	// this is an AJAX Simply request, output a message to the console
	jx()->log( 'Message 1', 'Message 2' );
}
Alternative to the name attribute
By default, data from the form is collected from fields with a name attribute. However, in some cases using this attribute is inconvenient. You can substitute it with id or data-name. That is, if the transmitted form does not have input fields with the name attribute, the plugin will look for inputs with the id or data-name attribute and use their values as the names.
For example:
<div onclick="ajaxs( 'ajaxs_my_function', this )">">
	<input type="text" id="param_name_1" value="value 1">
	<input type="text" id="param_name_2" value="value 2">
</div>
<div onclick="ajaxs( 'ajaxs_my_function', this )">">
	<input type="text" data-name="param_name_1" value="value 1">
	<input type="text" data-name="param_name_2" value="value 2">
</div>
JS function ajaxsURL() - URL of the AJAX request handler file
You can obtain it with a JS function:
ajaxsURL( action )
Sometimes you need to use this URL, for example for third-party JS code that sends requests not via ajaxs().
In the parameter action specify the PHP function handler: the same as in action for ajaxs().
Arbitrary parameters can be appended simply by adding them to the URL:
var ajaxsurl = ajaxsURL('my_action') + '&foo=bar&love=you';
Output of console in the HTML document
During development it can be handy to output everything that is sent to the console directly into the HTML. For this, create an HTML element on the page:
<pre id="ajaxs-console"></pre>
Now for ajaxs requests everything that is output to the browser console will also be displayed inside this tag.
For each request the contents of this tag are updated. If you want to preserve the previous content, you can add the class not-clear to the tag:
<pre id="ajaxs-console" class="not-clear"></pre>
Hook ajaxs_allow_process - Group rights check
For convenience, the plugin has a filter hook: ajaxs_allow_process. Here is how it looks in the code:
$allow = apply_filters( 'ajaxs_allow_process', true, $action, $jx );
if( ! $allow && $allow !== null ){
	wp_die( -1, 403 );
}
It fires at the beginning of processing each AJAX request and allows you to abort processing.
The hook is used to insert general checks before processing the request. For example, if a group of requests requires the same access check, so you don’t have to write the same code in every handler function, you can add the check once via this hook...
Example usage of ajaxs_allow_process
Suppose we have a class My_Class that contains methods handling AJAX requests. There are 10 such methods, and all require the same permission check: current_user_can('edit_others_posts'). Now, to avoid writing at the start of each method:
if( ! current_user_can('edit_others_posts') ) return;
Move this check to the hook, like this:
// general access check for all AJAX requests
add_filter( 'ajaxs_allow_process', function( $allow, $action ){

	// abort if this is our class and the user lacks permission
	if( false !== strpos($action, 'My_Class') && ! current_user_can('edit_others_posts') ){
		return false; // abort request
	}

}, 10, 2 );
Now, when processing any request directed to a method of the class My_Class, the check will run and if it is not passed, the AJAX request processing will be aborted.
This approach helps simplify code and guard against bugs (holes) if you forget to perform the necessary check.
The hook function 'ajaxs_allow_process' must return false to abort processing or return $allow for normal plugin operation.
AJAX Simply settings
All settings are available on a hidden settings page.
These links will be handy when the plugin is installed in mu-plugins or in a theme:
/wp-admin/options.php?page=ajaxs_opt_page/wp-admin/network/settings.php?page=ajaxs_opt_page(for multisite)
Also, you can visit this page from the plugins page (if the plugin is installed as a standard plugin):

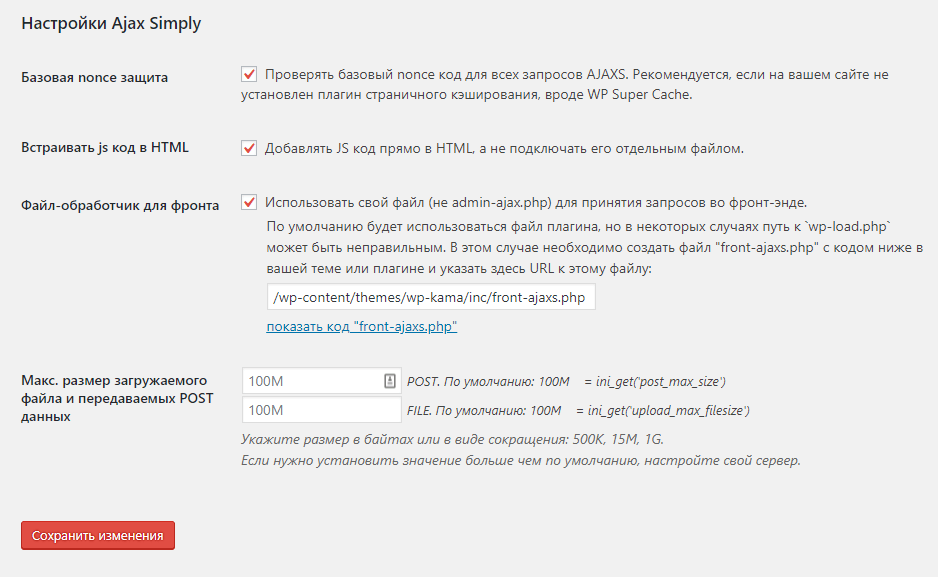
# Nonce protection
Basic nonce verification on the plugin by default is disabled so it works properly with page-caching plugins... See below how to enable it.
But this kind of check is needed! So important requests should be secured by you yourselves. Use at least the basic nonce code from the plugin; it is sent with every request. To check it during processing in PHP, use this code:
## PHP handler function
function ajaxs_my_func( $jx ){
	// Nonce verification
	if( ! wp_verify_nonce( $jx->ajaxs_nonce, 'ajaxs_action' ) )
		return; // abort

	// nonce check passed, do what needs to be done...
}
Or with the check_ajax_referer()
## PHP handler function
function ajaxs_my_func( $jx ){
	check_ajax_referer( 'ajaxs_action', 'ajaxs_nonce' ); // abort

	// nonce check passed, do what needs to be done...
}
Enable basic nonce verification for all requests
To avoid checking each request with the code above and just write the code once, you can enable the basic verification for all requests by default and the plugin will verify each request against its base nonce code.
This can be done on the plugin settings page (see above).
Or via a hook, for example in the theme file functions.php:
## allow ajaxs to perform basic nonce verification for all requests
add_filter( 'allow_ajaxs_nonce', '__return_true' );
This is a good security boost. If you forget to enable nonce verification, the plugin will do it for you.
Important requests (data deletion or modification) should be protected with your own unique nonce code!
Disable basic nonce verification for a specific request (since v1.4.5)
When the basic check is enabled in settings, you can disable it for a specific request. To do this, pass a non-empty parameter skip_basic_nonce in the request:
ajaxs( 'functionName', { skip_basic_nonce:1, string:'foo' }, function( res ){
	console.log( res )
} )
# Overriding the handler file on the frontend
For the frontend, sending requests to the file /wp-admin/admin-ajax.php is not very productive, because it loads everything needed in the admin area. You can override this URL:
This can be done on the plugin settings page (see above).
Or via a hook, for example in the theme file functions.php:
## override the AJAX request handler file for the front-end (/wp-admin/admin-ajax.php)
add_action( 'ajaxs_front_request_url', function(){
	return get_template_directory_uri() . '/front-ajaxs.php';
});
This code shows how to place such a file in the theme. To do this, in the theme root create a file front-ajaxs.php and place in it the code from /wp-admin/admin-ajax.php. Then you need to remove extra checks, the WP_ADMIN constant, and the admin_init hook. It will look like:
Very important to correctly specify the path to wp-load.php. Otherwise nothing will work!
Download
The plugin is paid and updates automatically just like WordPress plugins.