Linux Commands (Shell Bash, Unix, SSH, PuTTY)
A list of popular Linux commands by category that every developer should know.
In Windows, to manage a Linux server, people use the free PuTTY - it is the most popular.
Files/Folders
| Command | Action |
|---|---|
mc |
Midnight Commander - something like Norton Commander. |
ls |
Show list of files and directories. |
ls -al |
Show all files on the server (including hidden) + size + owner + permissions + modification date. |
ls -aln |
Displays UID instead of username. |
cd dir |
Change to directory "dir". |
cd |
Change to home directory. |
pwd |
Show current directory (path to current directory). |
mkdir dir |
Create directory "dir". |
cp file1 file2 |
Copy file1 to file2. |
cp -r folder1 folder2 |
Copy folder1 to folder2. |
cp -rp folder1 folder2 |
Copy folder1 to folder2 preserving file data (permissions). |
mv folder1 folder2 |
Rename/move folder. |
mv file1 file2 |
Rename/move file. |
rm file |
Delete the file named file. |
rm -r dir |
Delete directory "dir". |
rm -f file |
Force delete file. |
rm -rf dir |
Force delete directory dir *. |
rm -rf folder/* |
Empty directory folder. |
touch filename |
Create file with name filename. |
> filename |
Truncate file. > access.log. |
cat |
(concatenate) concatenates files. |
cat filename |
Show content of file filename. |
cat filename | less |
Show content of file filename with scrolling. |
cat filename | grep 'search string' |
Print lines containing the search string. |
cat > filename |
Create a file with written content (Ctrl+D to finish). |
cat >> filename |
Append to file. |
echo "hello" > filename |
Write hello to file. |
echo "hello" >> filename |
Append hello to file. |
more filename |
Show file content. |
less filename +G |
Show the last lines of the file. |
head filename |
Show first 10 lines of the file. |
tail filename |
Show last 10 lines of the file. |
tail -f filename |
Show file content as it grows, starting from the last 10 lines. |
Example of writing text to a file
cat > filename
This is text, perhaps pasted in from some other source.
Or else entered at the keyboard, doesn't matter.
[Ctrl+D]
Using the >> operator will append data to the end of the file, while > will overwrite the file content if it already exists.
It is also important to know that by default echo adds a newline character at the end. You can suppress it with the -n flag:
echo -n "hello" > filename
Disk Usage
| Command | Action |
|---|---|
df |
Show information about disk usage. |
df -h |
Same as df but human-friendly (in M, GB). |
du |
Show information about disk usage by files and folders. |
du -sh * |
Calculate disk usage of all folders in the specified directory. |
du -sh * | sort -hr |
Sort descending by size. |
du -sh dir |
Find the size of the folder dir. |
Processes
| Command | Action |
|---|---|
ps |
Shows currently active processes |
top |
Shows all processes |
kill process |
Kills the process with id "process" |
killall proc |
Kills all processes named proc |
bg |
Shows the list of background jobs and stopped jobs |
bg process |
Will continue a stopped process in the background |
chmod - permissions
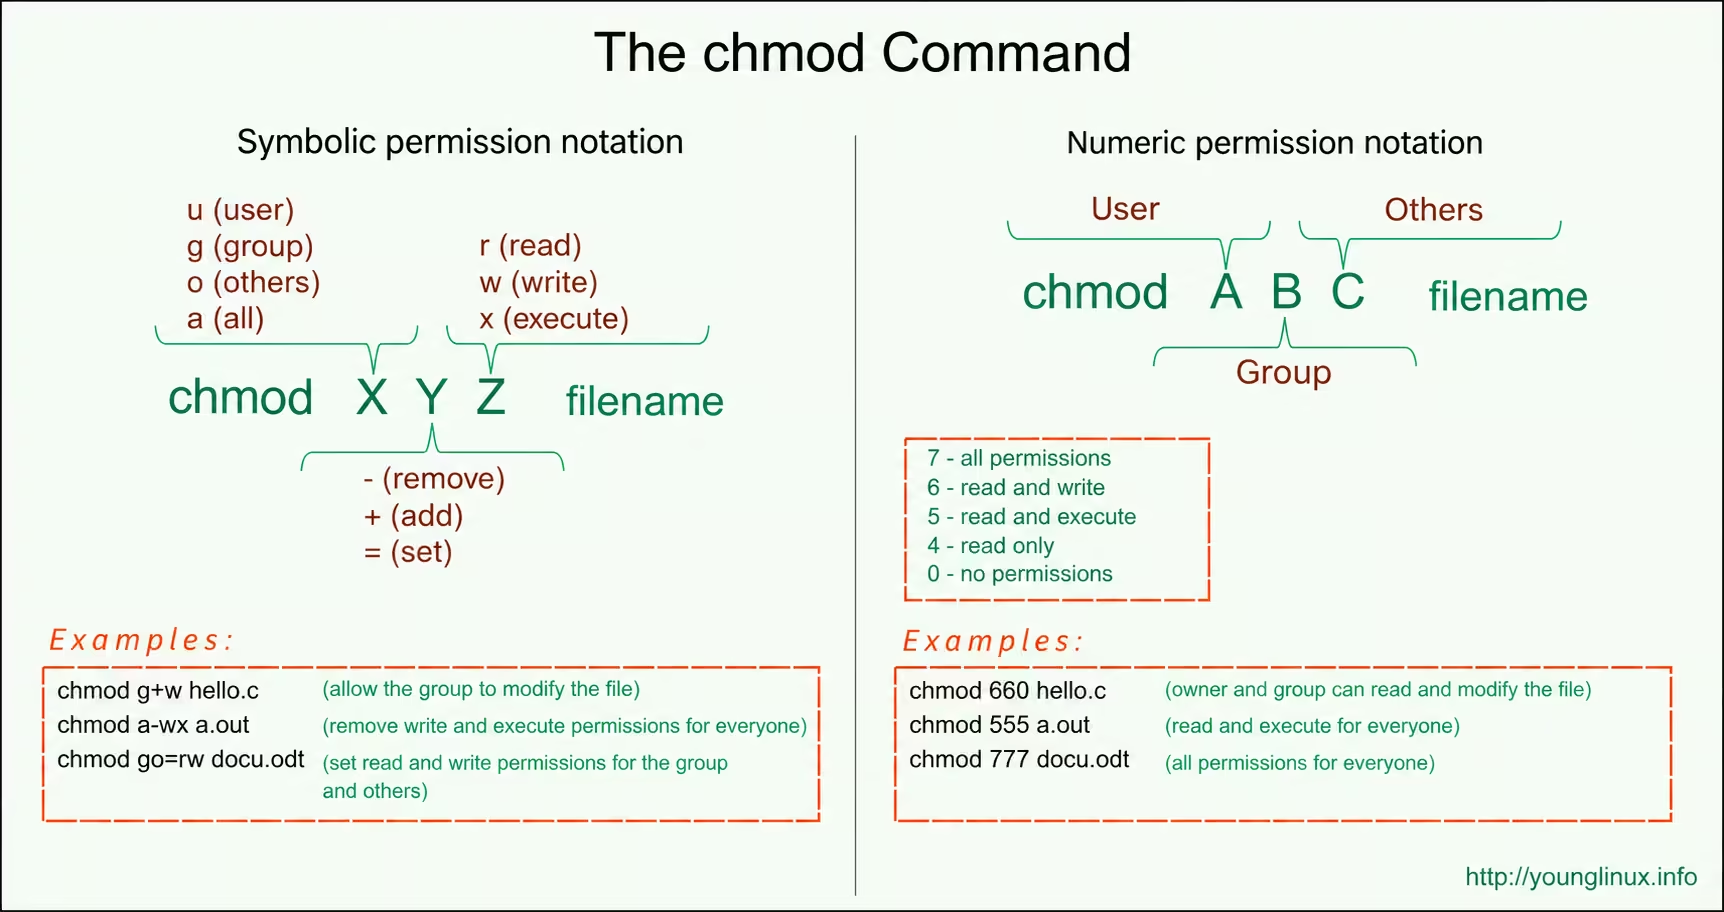
| Command | Action |
|---|---|
chmod 755 file |
Set permissions 755 for the file |
chmod o-r,a-w month.txt text.txt |
Forbid Others from reading and everyone from modifying two files. |
find /path/to/dir -type f -exec chmod 0644 {} \; |
Set permissions 644 on all files on the server |
find /path/to/dir -type d -exec chmod 0755 {} \; |
Set permissions 755 on all directories on the server |
chown - owner and group
chown user options /path/to/file
Options:
-c,--changes- detailed output of all changes performed.-f,--silent,--quiet- minimal information, suppress error messages.--dereference- change permissions for the file that the symlink points to, rather than the link itself (default behavior).-h,--no-dereference- change permissions of symbolic links and do not touch files they point to.--from- change the user only for files whose owner is the specified user and group.-R, --recursive - recursive processing of all subdirectories.-H- if a symbolic link to a directory is provided, follow it.-L- follow all symbolic links to directories.-P- do not follow symbolic links to directories (default).
| Command | Action |
|---|---|
chown root ./dir1 |
Change owner of folder dir1 to root. |
chown root:root ./dir2 |
Change owner and group of folder dir1 to root. |
chown -R root:root ./dir3 |
Change owner and group of folder dir1 and all nested files/folders to root. |
chown --from=root:root www-data:www-data -cR ./ |
Change owner and group to www-data only for files/folders whose owner and group are root in the current directory. |
SSH
| Command | Action |
|---|---|
ssh user@host |
Connect to host "host" as "user". |
ssh user@host "echo \$HOME" |
Immediately run the command echo $HOME on the server. |
ssh -p port user@host |
Connect to host "host" on port "port" as "user". |
ssh-copy-id user@host |
Add the key to "host" for user "user", enabling passwordless login via the key. |
Non-interactive connection and the file ~/.bashrc
When a command is executed remotely via ssh, for example, ssh user@host "echo $HOME", the file ~/.bashrc is not connected! If you have aliases in this file, they will not work! And this can play a nasty joke in some cases.
This happens because when you run a command remotely with SSH, the remote shell is typically started non-interactively. When the shell starts in non-interactive mode, it may skip initialization files such as .bashrc to provide a faster and more predictable execution environment.
.ssh/config
To avoid typing credentials every time, you can create a file called .ssh/config and add a config for remote connections:
Host myhost
	HostName 56.30.203.178
	User ubuntu
	Port 22
	IdentityFile ~/.ssh/qa-server.key
Now, to connect to the server in the console, use:
$ ssh myhost
All possible parameters:
Host {YOUR_HOST_KEY}
  AddressFamily any
  BatchMode no
  CheckHostIP yes
  Cipher 3des
  Ciphers aes128-ctr,aes192-ctr,aes256-ctr,arcfour256,arcfour128,aes128-cbc,3des-cbc
  ConnectTimeout 0
  EscapeChar ~
  ForwardAgent no
  ForwardX11 no
  GSSAPIAuthentication no
  GSSAPIDelegateCredentials no
  HostbasedAuthentication no
  IdentityFile ~/.ssh/id_dsa
  IdentityFile ~/.ssh/id_ecdsa
  IdentityFile ~/.ssh/id_ed25519
  IdentityFile ~/.ssh/id_rsa
  IdentityFile ~/.ssh/identity
  MACs hmac-md5,hmac-sha1,[email protected],hmac-ripemd160
  PasswordAuthentication yes
  PermitLocalCommand no
  Port 22
  Protocol 2
  ProxyCommand ssh -q -W %h:%p gateway.example.com
  RekeyLimit 1G 1h
  RhostsRSAAuthentication no
  RSAAuthentication yes
  StrictHostKeyChecking ask
  Tunnel no
  TunnelDevice any:any
  VisualHostKey no
File/Folder Search/Find
find
Manual: https://www.geeksforgeeks.org/find-command-in-linux-with-examples/
# Will find all files/folders that start with "Top" (case-sensitive). In the current directory
find . -name 'Top*'

# Will find all files/folders that start with 'top' (case-insensitive - Top, top, TOP)
find / -iname 'Top*'

# Will find all files/folders that start with 'top', followed by 3 any characters
find / -name 'top???'

# Will find all files/folders with extension ".tex" (in home directory ~)
find ~ -name '*.tex'

# Exclude a directory from the search.
find . -name '*.js' -not -path '/dir/*'
# looks for a directory named starting with "work".
find / -type d -name 'work*'

# looks for a file ending with "work.rb".
find / -type f -name '*work.rb'

# finds all svg and png files by regex.
# Note: -regex pattern must match the full file name
# relative to the specified directory, not a single file name.
find / -regex ".*\.\(svg\|png\)$"

# matches by path occurrence.
find ~/ -regex ".*/Docs/Для работы/.*"

# finds files in /usr/local, size greater than 10,000 KB
$ find /usr/local -size +10000k

# finds files in home directory, size less than 300 bytes
find ~ -size -300b

# finds empty files (size 0)
find ~ -empty
# print all files in /usr/local, modified in the last 24 hours.
find /usr/local -mtime -1

# print all files in home directory, modified yesterday.
# The -daystart option defines time counting from the beginning of the current day.
find ~ -mtime 1 -daystart

# print all files in /usr, modified within the last year:
find /usr -mtime +356 -daystart

# print all files in home directory modified in the period from 2 to 4 days ago:
find ~ -mtime 2 -mtime -4 -daystart

# find files newer than a given file; pass its name as the argument to -newer.
# print all files in /etc that are newer than /etc/motd:
find /etc -newer /etc/motd
More examples: https://www.opennet.ru/docs/RUS/linux_base/node149.html
ripgrep
This is a separate package https://github.com/BurntSushi/ripgrep
Installation on Ubuntu:
$ sudo apt-get install ripgrep

// or this (latest version)
// Releases: https://github.com/BurntSushi/ripgrep/releases
$ curl -LO https://github.com/BurntSushi/ripgrep/releases/download/13.0.0/ripgrep_13.0.0_amd64.deb
$ sudo dpkg -i ripgrep_13.0.0_amd64.deb
| Command | Action |
|---|---|
rg -i "hello" /sys/ |
ripgrep - grep equivalent. Search for the word hello in all files under /sys/ (case-insensitive search). |
rg -ig access.log "/api/wp" |
Search substring "/api/wp" in the file access.log |
grep
grep [options] pattern [file...]
Examples:
# Searches for "word" in "file".
grep 'word' file

# Search by regex
grep "\<[A-Za-z].*\>" file

# Look for the word hello in all files of the /sys/ folder.
grep -r hello /sys/

# Look for the word text in all files in the current folder. ignore-case (i) line-numbers (n)
grep -inIR "text"
# Case insensitive: match any line in foo.txt
# that contains "bar"
grep -i bar foo.txt

# match any line in bar.txt that contains
# either "foo" or "bar"
grep -E "foo|bar" bar.txt

# Remove all folders in current dir except "foo" and "bar"
ls | grep -v -Ew 'foo|bar' | xargs rm -r

# match anything that resembles a URL in
# foo.txt and only print out the match
grep -oE "https?:\/\/((\w+[_-]?)+\.?)+" foo.txt

# can also be used with pipes:
# match any line that contains "export" in
# .bash_profile, pipe to another grep that
# matches any of the first set of matches
# containing "PATH"
grep "export" .bash_profile | grep "PATH"

# follow the tail of server.log, pipe to grep
# and print out any line that contains "error"
# and include 5 lines of context
tail -f server.log | grep -iC 5 error

# can also be used with pipes:
# match any line that contains "export" in
# .bash_profile, pipe to another grep that
# matches any of the first set of matches
# containing "PATH"
grep "export" .bash_profile | grep "PATH"
Find all files containing specific text (string) on Linux.
# search pattern in all files:
grep -rnw '/path/to/somewhere/' -e 'pattern'

# only search through those files which have .c or .h extensions:
grep --include=\*.{c,h} -rnw '/path/to/somewhere/' -e "pattern"

# exclude searching all the files ending with .o extension:
grep --exclude=\*.o -rnw '/path/to/somewhere/' -e "pattern"

# exclude the dirs dir1/, dir2/ and all of them matching *.dst/:
grep --exclude-dir={dir1,dir2,*.dst} -rnw '/path/to/search/' -e "pattern"
Options:
# Matching options:

-r, --recursive             # All files recursively
							# follow symlinks only if they are on the command line, but
							# skip symlinks that are found recursively.
-R, --dereference-recursive # All files recursively (follow all symlinks).
-e, --regexp=PATTERN
-f, --file=FILE
-i, --ignore-case     # Forgets about case sensitivity
-v, --invert-match
-w, --word-regexp     # Look for whole words (not substrings)
-x, --line-regexp
-I                    # Skip binary files

# Pattern options:

-G, --basic-regexp    # basic regular expression (default)
-E, --extended-regexp # extended regular expression
-P, --perl-regexp     # perl compatible regular expression
-F, --fixed-strings   # list of fixed strings

# Output Options:

-n, --line-number     # Show the line numbers of the matches
-c, --count           # print the count of matching lines. suppresses normal output
	--color[=WHEN]    # applies color to the matches. WHEN is never, always, or auto
-m, --max-count=NUM   # stop reading after max count is reached
-o, --only-matching   # only print the matched part of a line
-q, --quiet, --silent
-s, --no-messages     # suppress error messages about nonexistent or unreadable files
Manual: https://help.ubuntu.com/community/grep
Cheats: https://devhints.io/grep https://quickref.me/grep
diff
# compare two directories
diff -r directory1 directory2

# use -q option for brief output (it reports only when files differ).
diff -rq directory1 directory2

# exclude internal folder `.git` from compare
diff -r directory1 directory2  --exclude=.git --exclude=.idea
System Information (disks, files, sizes)
| Command | Action |
|---|---|
date |
Show time and date |
cal |
Show calendar |
uptime |
Check uptime (time since last boot) |
w |
Show how many users are currently using the server |
whoami |
Show your login |
finger user |
Show info about user "user" |
uname -a |
Kernel information |
cat /proc/cpuinfo |
CPU information |
cat /proc/meminfo |
Memory information |
man command |
Show all about a command |
free |
How much memory is used |
whereis program |
Find the location of a program |
which program |
Determine what will be run for "program" |
vmstat |
Show CPU load |
ln (links)
Links in Linux come in two types:
Symbolic
Symbolic link (symbolic or soft link) — a special file that is a link to another file or directory.
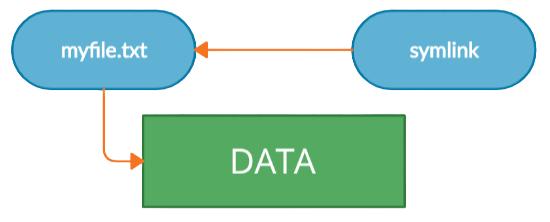
A symbolic link does not contain inside a copy of the file it points to. It is merely a pointer to the file. So if you delete the source file, the soft link has no value because it points to a non-existent file.
The relationship between a symbolic link and the file is “soft.” If you delete the symbolic link, the file it points to is not deleted.
When creating symbolic links, you can specify a relative path to the target file. In that case, the link assumes the relative path is relative to the directory where the link itself is created (not relative to the directory from which it was created).
Hard
Hard link - is an alias for the file. When you create a hard link, an additional pointer to the existing file is created, but not a copy of the file.
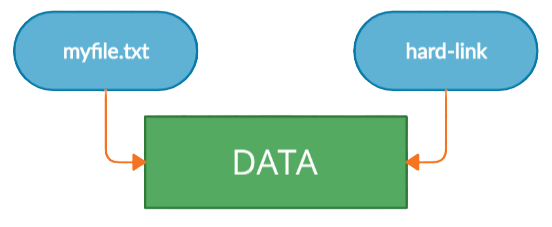
Hard links look in the filesystem like another full-fledged file.
Even if you delete the original file, the hard link will still contain the data of the original file. Because a hard link behaves as a mirror copy of the source file.
In Linux every file has a unique identifier – an inode. This number uniquely identifies the file in the filesystem. A hard link and the file it was created for share the same inode. Therefore, a hard link has the same permissions, owner, and last modification time as the target file. Only the file names differ. A hard link is basically another name for the same file.
Hard links appeared earlier than symbolic links, but they are now outdated. In day-to-day work, hard links are used rarely.
Syntax:
ln options source_file link_name
Examples:
“symbolic” link (symbolic link)
ln -s /home/pingvinus/myfile.txt mylink

ls -li
792300 -rw-rw-r-- 1 kama kama 13-Feb-13 13:07 myfile.txt
787622 lrwxrwxrwx 1 kama kama 13-Feb-13 13:08 mylink -> /home/kama/myfile.txt

# link and target file have different inodes (792300 and 787622).
“hard” link
ln /home/pingvinus/myfile.txt mylink

ls -li
787622 -rw-rw-r-- 2 kama kama 13-Feb-13 13:19 myfile.txt
787622 -rw-rw-r-- 2 kama kama 13-Feb-13 13:19 mylink

# You can see both files have the same inode=787622,
# since they are effectively different names for the same file (data)
# (inode of which is 787622).
More: https://pingvinus.ru/note/ln
Archives
tar
# Pack (compress) files in the current folder into an archive myfile.tar
tar -cf myfile.tar

# Pack (compress) with gzip (special compression on the server)
tar -czf myfile.tar.gz dir

# Unpack myfile.tar
tar -xf myfile.tar

# Unpack gzip file
tar -xzf myfile.tar.gz

# Unpack into destination folder dest.
tar -xzf myfile.tar.gz -C dest

# Compress using Gzip
tar -cjf myfile.tar.bz2

# Unpack Bzip2 file
tar -xjf myfile.tar.bz2
Example.
Place folders languages, uploads (with files) located in folder www/wp-content/ (relative to the current directory) into archive file dev/dump/files.tar.gz (path relative to the current directory):
$ tar -cz -f dev/dump/files.tar.gz -C www/wp-content/ languages uploads
Options:
tar [options] [archive-file] [file or directory to be archived]

Options:
-c : Creates Archive
-x : Extract the archive
-f : creates archive with given filename
-t : displays or lists files in archived file
-u : archives and adds to an existing archive file
-v : Displays Verbose Information
-A : Concatenates the archive files
-z : zip, tells tar command that creates tar file using gzip
-j : filter archive tar file using tbzip
-W : Verify a archive file
-r : update or add file or directory in already existed .tar file
-C dir : change current directory to dir before performing any operations
zip, unzip, gzip, gunzip
| Command | Action |
|---|---|
gzip file |
Compress file and rename to its file.gz. |
gzip -d file.gz |
Uncompress file.gz to file. Deletes the original. |
gunzip file.gz |
Uncompress file.gz to file. Deletes the original. |
gunzip --keep file.gz |
Uncompress file.gz to file. Keep the original. |
gunzip -c file.gz > /other/file |
Uncompress file.gz to another location. Deletes the original. |
-c is used to write decompressed data to STDOUT.
| Command | Action |
|---|---|
man zip / man unzip |
Extended documentation. |
zip --help или unzip --help |
Help for commands and options. |
zip archive.zip filename |
Compress file filename into archive archive.zip. |
zip –r archive.zip dirname |
Compress folder dirname into archive archive.zip. Will recreate archive if it already exists. |
zip –ru archive.zip dirname |
Add new/Update changed files in archive.zip. |
zip -d file.zip "assets/*" |
Remove all files from folder assets/* inside archive file.zip. |
unzip archive.zip |
Unpack archive into current folder. |
unzip archive.zip –d dirname |
Unpack archive into folder dirname. |
unzip -l archive.zip |
List files in archive. |
zip [options] [file_name.zip] [files_names]

-d : Remove files from the archive
-u : Update files in the archive
-m : Move files into the archive
-r : Recursively zip a directory
-x : Exclude files from the zip (zip -r name.zip -x dirname)
-v : Verbose mode - diagnostic information during compression.
Difference between zip and gzip.
gzip compresses the content of a single file. It does not store original filename and metadata (only its content).
zip compresses multiple files or folders with files. It stores information about each file: name, creation/modification date, etc.
System, Apache, MySQL and Database
| Command | Action |
|---|---|
echo $PATH |
Show all system paths in the $PATH variable |
apachectl restart |
Restart the Apache server |
apachectl startssl |
Start the Apache server |
apachectl stop |
Stop the Apache server |
/usr/local/etc/rc.d/mysql-server restart |
Restart MySQL |
mysqldump -u DB_USER -p DB_PASSWORD DB_NAME > /path/file.sql |
Create a copy of the database as file.sql |
mysql -u DB_USER -p DB_PASSWORD -D DB_NAME < /path/file.sql |
Import file.sql into the mysql database on the server |
exit |
Log out of the system |
reboot |
Reboot the server |
alias wpcli='php7.1 /usr/local/bin/wp' |
Create alias wpcli for the command php7.1 /usr/local/bin/wp. Works only for the session. |
alias -p |
Show all existing aliases. |
unalias wpcli |
Remove alias wpcli |
Copying
scp (ssh)
Copy file from a remote host to the local host:
$ scp username@from_host:file.txt /local/directory/
Copy file from local host to a remote host:
$ scp file.txt username@to_host:/remote/directory/
Copy directory from remote host to local host:
$ scp -r username@from_host:/remote/directory/ /local/directory/
Copy directory from local host to a remote host:
$ scp -r /local/directory/ username@to_host:/remote/directory/
Copy file from remote host to remote host:
$ scp username@from_host:/remote/directory/file.txt username@to_host:/remote/directory/
Notes:
-
Hostcan be anIPor a domain name. After pressing Enter you will be prompted to enter SSH password. -
Although this page covers SCP Linux, the instructions will also work on Mac using "Terminal". You can also use WinSCP to perform this task on a Windows PC/server.
- When copying the source file to the destination file that already exists, SCP will replace the contents of the destination file. So be careful.
| SCP options | |
|---|---|
–r |
Recursive copy of entire directories. Note that it will follow symbolic links encountered while traversing the tree. |
-C |
Enable compression. Passes the -C flag to ssh to enable compression. |
-P |
port - Specifies the port to connect to on the remote host. Note that this option uses a capital P. |
-p |
Preserve modification times, access times, and modes from the original file. |
-q |
Quiet mode: disable progress indicator, as well as warnings and diagnostic messages from ssh. |
-o |
ssh_option - May be used to pass ssh options in the format used by ssh_config. |
-v |
verbose mode. Print debugging messages about progress. Useful for diagnosing connection, authentication, and configuration problems. |
-l |
limit - Limit the bandwidth used, specified in Kbit/s. |
rsync
Online configurator for the command rsyncinator.app.
rsync options source destination
Synchronizing folders on the local computer
rsync -azvh /home/user/documents /mnt/backup_dir/
Synchronizing with a remote server
rsync -azv /home/user/documents/ [email protected]:/home/
Synchronizing files over ssh
rsync -avzh -e ssh [email protected]:/home/ /home/user/documents/
# Or
rsync -avzh --rsh=ssh [email protected]:/home/ /home/user/documents/
Port for ssh:
rsync -avzh -e "ssh -p 22" [email protected]:/home/ /home/user/documents/
Setting permissions of files/folders during copying (these permissions will apply to the destination files):
Flag -a enables --perms (preserve original permissions). Suppose we want the copied files/folders to differ from the source permissions. We can use the --chmod option, where you specify the permissions as if set on the source, and they will be copied to the destination folder.
Here the prefix D - directory, F - file.
rsync -avzh --chmod=D777,F666 --rsh=ssh [email protected]:source/ destination/
# Another way of writing
--chmod=777
--chmod=ugo=rwX
Excluding files
rsync --exclude 'file1.txt' source/ destination/
rsync --exclude 'file1.txt'  --exclude 'dir1/' source/ destination/

rsync --exclude={file1.txt,dir1/} source/ destination/
rsync --exclude={'file1.txt','dir1/'} source/ destination/

rsync --exclude={'*.txt','dir1/'} source/ destination/

# list.txt here is a file where every exclude rule is on separate line
rsync --exclude-from={'list.txt'} source/ destination/
When syncing directories through rsync, it is important to add a trailing slash / to the source path.
-
If the source path does NOT end with
/, rsync will create the directory itself (including its contents) in the destination directory. But usually we expect to copy only the contents of the directory into the destination folder. For example:# incorrect rsync -av /path/to/source /path/to/destination
This command will create a folder
source(with contents) in/path/to/destination- i.e. you end up with/path/to/destination/source. Usually this is NOT what we expect! -
If the source path ends with
/, rsync will copy only the contents of the source folder into the destination folder. For example:# correct rsync -av /path/to/source/ /path/to/destination/ # also correct, but a bit questionable rsync -av /path/to/source/ /path/to/destination
Both commands will work the same and copy the contents of
/path/to/sourceinto/path/to/destination. Usually, this is exactly what we expect.
Thus, you should always add a trailing slash to the source. You may omit it when you want to create the directory itself (with its contents) in the destination.
The -a (--archive) option is a shorthand for a set of options:
rsync -r -l -t -p -g -o -D
The exact composition may differ slightly in different rsync versions.
Some options can be disabled using the --no- prefix:
rsync -a --no-owner
rsync -a --no-o
This is convenient when you want to use -a, but exclude one of the included options. For example, -a --no-owner will sync in archive mode, but will not copy the file owner.
Order matters: the last option wins.
rsync --no-r -a
In this case -r will still be included, because -a is specified later.
Correct:
rsync -a --no-r
Interesting example:
Synchronize folders, but process a nested folder some-dir separately: inside it we sync only the folder my-dir, and the other folders are not synchronized and will be removed in destination.
rsync -a --delete --delete-excluded \
	--include="/some-dir/my-dir/***" \
	--exclude="/some-dir/*" \
	"runtime/" "/some/path/runtime/"
Order matters (first allow the needed folder, then forbid the others):
--include=...
--exclude=...
| Option | description |
|---|---|
-e |
--rsh=COMMAND Specify the shell for remote access, e.g., ssh. |
-a |
--archive Archive mode - preserves all metadata and permissions of the original files. Short for -r -l -t -p -g -o -D |
-z |
--compress Compress files before transfer. |
-v |
--verbose Show detailed information during the copy process. |
-h |
--human-readable Show numbers in human-readable format. |
-q |
--quiet Minimal information. |
-c |
--checksum Verify file checksums. |
-u |
--update Skip files that are newer in the destination. |
-l |
--links Copy symlinks as symlinks. |
-L |
--copy-links Convert symlinks to the contents of the linked file. |
-H |
--hard-links Copy hard links. |
-t |
--times Preserve modification times. |
-p |
--perms Preserve file permissions. |
-o |
--owner Preserve owner (super-user only). |
-g |
--group Preserve group. |
-W |
--whole-file Copy files whole. |
-r |
--recursive Recursively copy directories. |
-R |
--relative Use relative paths. |
-b |
--backup Create backups. |
-x |
--one-file-system Stay on this filesystem - do not cross filesystem boundaries. |
*** |
the folder itself plus all contents (recursive). E.g.: --include="/dir/***" |
--delete |
Delete files that are not in the source. |
--delete-excluded |
delete from destination files/folders excluded from copying |
--chmod=CHMOD |
Permissions to apply to the source files. |
--exclude=PATTERN |
Exclude files by pattern. |
--exclude-from=FILE |
Read exclude patterns from the specified file. |
--include=PATTERN |
Include files by pattern. |
--include-from=FILE |
Read include patterns from the specified file. |
--progress |
Show transfer progress. |
--stats |
Show transfer statistics. |
--version |
-V The utility version. |
--dry-run |
-n Run a trial but make no changes. |
--no-perms |
Do not preserve original permissions (when -p is set). |
--no-recursive |
Disable recursion. |
More: https://man7.org/linux/man-pages/man1/rsync.1.html
Network
| Command | Action |
|---|---|
ping host |
Show ping to the host |
whois dom.com |
Show WHOIS information for domain "dom.com" |
dig dom.com |
Show which DNS contains domain "dom.com" |
dig -x host |
Reverse lookup of host |
wget myfile |
Download file myfile to the computer |
wget -c file |
If download was interrupted, this can resume it |
wget https://www.mysite.com/myfile.zip |
Download the specified file from the internet to the current directory on the server |
Useful commands
| Command | Action |
|---|---|
cd - |
Return to the previous directory. [Example]() |
pushd / popd |
Save and return to a directory. [Example]() |
history |
Show the history of all commands. HISTTIMEFORMAT="%Y-%m-%d %T " in ~/.bashrc, to add the time next to each command when it was used. [Example]() |
tail -f /path/to/file |
Show the end of a file and watch for changes. |
truncate -s 0 /path/to/file |
Empty a file. |
{command} | column -t |
Display the result in column format. |
which {command} |
For example which php shows the path to the binary or the link that handles the command. [Example]() |
sudo !! |
Repeat the last command with sudo prefix. |
exit |
Logout / exit. |
Keyboard Shortcuts
| Command | Action |
|---|---|
Middle Mouse |
Paste selection. |
Ctrl C |
Terminate the current command. |
Ctrl D |
Log out / switch user (instead you can use exit). |
Ctrl U |
Delete the line. |
Ctrl Z |
Stop the current command and continue with fg or bg. |
Ctrl R |
History search. |
Ctrl A |
Move to the start of the line. |
Ctrl ← \ Alt B |
Move cursor to the start of the previous word. |
Ctrl → \ Alt L |
Move cursor to the end of the word. |
Ctrl W |
Cut the word before the cursor. |
Ctrl Y |
Paste the previously cut text. |
Ctrl K |
Delete everything after the cursor. |
Ctrl Y |
Paste text back. |
Ctrl U |
Delete the entire line. |
Less Useful
| Command | Action |
|---|---|
Alt T |
Swap words before the cursor. |
Ctrl T |
Swap characters before the cursor. |
Alt U |
Convert the word after the cursor to UPPERCASE. |
Ctrl D / Delete | Delete one character after the cursor position.
Internet Speed Test
wget --output-document=/dev/null http://speedtest.wdc01.softlayer.com/downloads/test500.zip
Useful Links
- How to run two or more terminal commands at once in Linux - characters ; ' && ||
Error Codes (industry standard)
The command exit in bash accepts integers from 0 to 255, in most cases enough to use 0 and 1, however there are other reserved exit codes that can be used for more specific errors.
In the Linux Documentation Project there is a table of reserved exit codes and what they are used for.
| Exit Code Number | Meaning | Example | Comments |
|---|---|---|---|
| 1 | Catchall for general errors | let "var1 = 1/0" | Miscellaneous errors, such as "divide by zero" and other impermissible operations |
| 2 | Misuse of shell builtins (per Bash documentation) | empty_function() {} | Missing keyword or command, or permission problem (and diff return code on a failed binary file comparison). |
| 126 | Command invoked cannot execute | /dev/null | Permission problem or command is not an executable |
| 127 | "command not found" | illegal_command | Possible problem with $PATH or a typo |
| 128 | Invalid argument to exit | exit 3.14159 | exit takes only integer args in the range 0 - 255 (see first footnote) |
| 128+n | Fatal error signal "n" | kill -9 $PPID of script | $? returns 137 (128 + 9) |
| 130 | Script terminated by Control-C | Ctl-C | Control-C is fatal error signal 2, (130 = 128 + 2, see above) |
| 255* | Exit status out of range | exit -1 | exit takes only integer args in the range 0 - 255 |
According to the table above, exit codes 1 - 2, 126 - 165 and 255 have special meanings, so they should be avoided for user exit. Finishing a script with exit code 127 may cause confusion when debugging. In many scenarios exit 1 is used as a general error, but since code 1 means different errors, it is not particularly helpful for debugging.
There was an attempt to standardize exit status numbers, but it was intended for C/C++ programmers. A similar standard for scripting could be appropriate. The author suggests limiting user-defined exit codes to the range 64 - 113 (in addition to 0 – success) to align with the C/C++ standard. This would limit to 50 valid codes and simplify debugging.
Note: Running echo $? after a script finishes will yield a result that matches the above table only in bash or sh. Running C-shell or tcsh may produce different values in some cases.
Cheat Sheet
Disk usage
- df -h — show free and used space on mounted filesystems.
- df -i — show free inodes on mounted filesystems.
- fdisk -l — show disk partitions, their sizes and types.
- du -ah — show disk usage for all files and directories.
- du -sh — show disk usage of the current directory.
- findmnt — show the mount point of all filesystems.
- mount [device_path] [mount_point] — mount a device.
Keyboard shortcuts
- Ctrl + C — terminate current process in terminal.
- Ctrl + Z — suspend current process (can be resumed with fg or sent to background with bg).
- Ctrl + W — cut one word before the cursor and copy.
- Ctrl + U — cut part of the line before the cursor and copy.
- Ctrl + K — cut part of the line after the cursor and copy.
- Ctrl + Y — paste from clipboard.
- Ctrl + R — search the command history.
- Ctrl + O — run the found command.
- Ctrl + G — exit history without executing a command.
- !! — repeat the last command.
- exit — exit the current session.
Network
- ip addr show — show IP addresses and network interfaces.
- ip address add [IP address] — assign IP address to interface eth0.
- ifconfig — show IP addresses of all network interfaces.
- netstat -pnltu — show active (listening) ports.
- netstat -nutlp — show TCP and UDP ports and the corresponding programs.
- whois [domain] — show domain information.
- dig [domain] — show DNS information for the domain.
- dig -x host — perform reverse DNS resolution of a domain.
- dig -x [IP address] — perform reverse DNS resolution of an IP address.
- host [domain] — perform an IP lookup for the domain.
- hostname -I — show the local IP address.
- wget [file] — download a file from a domain.
Hardware information
- dmesg — show boot messages.
- cat /proc/cpuinfo — show CPU information.
- free -h — show free and used memory (use -m for MB).
- lshw — show hardware configuration information.
- lsblk — show block device information.
- lspci -tv — show PCI devices as a tree.
- lsusb -tv — show USB devices as a tree.
- dmidecode — show hardware information from BIOS.
- hdparm -i /dev/[disk] — show disk data information.
- hdparm -T /dev/[disk] — perform disk read speed test.
- badblocks -s /dev/[disk] — check the disk for unreadable blocks.
File compression
- tar cf [archive.tar] [file] — create an archive from a file.
- tar xf [archive.tar] — extract an archive.
- tar czf [archive.tar.gz] — create a gzip-compressed tar archive.
- gzip [file] — compress a file with .gz extension.
Search
- grep [pattern] [file] — find a pattern in a file.
- grep -r [pattern] [folder] — recursively search for a pattern in a directory.
- locate [name] — find all files and folders by name.
- find [/path/to/folder] -name [a] — find files starting with [a] in the specified folder.
- find [/path/to/folder] -size +100M — find files larger than 100 MB in the specified folder.
File transfer
- scp [file.txt] [server:/tmp] — securely copy a file to the server in /tmp.
- rsync -a [/your/folder] [/backup/] — synchronize the contents of a folder with a backup.
File operations
- ls — show files in the directory.
- ls -a — show all files, including hidden.
- pwd — show the current directory.
- mkdir [folder] — create a new directory.
- rm [file] — delete a file.
- rm -r [folder] — delete a directory recursively.
- rm -rf [folder] — delete a directory recursively without confirmation.
- cp [file1] [file2] — copy contents of file1 to file2.
- cp -r [folder1] [folder2] — recursively copy folder1 contents to folder2.
- mv [file1] [file2] — rename file1 to file2.
- ln -s /path/to/[file] [link] — create a symbolic link to a file.
- touch [file] — create a new file.
- more [file] — view file content page by page.
- head [file] — show first 10 lines of the file.
- tail [file] — show last 10 lines of the file.
- gpg -c [file] — encrypt a file.
- gpg [file.gpg] — decrypt a file.
- wc — print word, line, and byte counts for a file.
Directory navigation
- cd .. — go up one level in the directory structure.
- cd — go to the home directory ($HOME).
- cd /path/to/directory — go to the specified directory.
Users
- id — show information about the active user.
- last — show the last logins to the system.
- who — show who is logged in.
- w — show who is logged in and their activity.
- groupadd [group] — add a new group.
- adduser [user] — add a new user.
- usermod -aG [group] [user] — add a user to a group.
- userdel [user] — delete a user.
- usermod — modify user information.
Package installation
- yum search [keyword] — find a package by keyword.
- yum info [package_name] — show information about a package.
- yum install [package_name.rpm] — install a package using YUM.
- dnf install [package_name.rpm] — install a package using DNF.
- rpm -i [package_name.rpm] — install an RPM package from a local file.
- rpm -e [package_name.rpm] — remove an RPM package.
- tar zxvf [source_code.tar.gz] — extract source code.
- cd [source_code] — go to the source code directory.
- ./configure — configure the source code.
- make — compile the program.
- make install — install the program.
Process-related commands
- ps — show snapshot of active processes.
- pstree — show processes as a tree.
- pmap — show memory map of processes.
- top — show all running processes.
- kill [process ID] — terminate process by its ID.
- pkill [process name] — terminate process by name.
- killall [process name] — terminate all processes with the given name.
- bg — show list of stopped tasks and resume them in the background.
- fg — bring last suspended task to foreground.
- fg [task] — bring a specified task to foreground.
- lsof — show files opened by processes.
SSH Access
- ssh user@host — connect to host as specified user.
- ssh host — secure connection to host via SSH (default port 22).
- ssh -p [port] user@host — connect to host using the specified port.
- telnet host — connect to a host via Telnet (default port 23).
System information
- uname -r — show system information.
- uname -a — show kernel version information.
- uptime — show system uptime and load averages.
- hostname — show system hostname.
- hostname -i — show system IP address.
- last reboot — show reboot history.
- date — show current date and time.
- timedatectl — query and change system time.
- cal — show the current month and calendar.
- w — show users logged in.
- whoami — show current user name.
- finger [username] — show information about the user.
File permissions
- chmod 777 [file] — give read, write, and execute permissions to everyone.
- chmod 755 [file] — give full access to the owner, and read/execute to group and others.
- chmod 766 [file] — give full access to the owner, and read/write to the group and others.
- chown [user] [file] — change the owner of the file.
- chown [user]:[group] [file] — change the owner and group of the file.
--
Used as reference for https://ru.hostings.info/schools/komandy-dlya-putty-ssh-unix-i-linux-serverov.html