add_theme_support()
Registers support for new theme features in WordPress (support for thumbnails, post formats, etc.).
If the function is called from the theme, it should be located in the functions.php file. It can also be called from a plugin by hooking into the event: after_setup_theme.
Important: Always call the function during the after_setup_theme event or directly in the functions.php file. Do not hook the function to the init event - it may be too late.
No Hooks.
Returns
null|false. The function does not return anything.
Usage
add_theme_support( $feature, ...$args );
- $feature(string) (required)
The name of the feature being added.
The following features are read-only and should be used in the current_theme_supports() function:
widgets- use register_sidebar() or register_sidebars() instead.menus- use register_nav_menu() or register_nav_menus() instead.editor-style- use add_editor_style() instead.
With WP 5.0, features were added that are used as Gutenberg options (these options can also be changed via the block_editor_settings filter). See also the documentation:
align-wideeditor-color-palettedisable-custom-colorseditor-font-sizesdisable-custom-font-sizeseditor-styleswp-block-stylesdark-editor-style
- ...$args(mixed)
Optional additional arguments to pass along with some features. Each feature has its own parameters:
- For post formats, specify the formats here.
- For thumbnails, specify the post types where they will work.
- etc. (see below).
Examples
#1 Example of adding your own features for themes
Using custom capabilities. You can register support for your feature in the plugin, allowing theme developers to use this feature at their discretion.
// Registering the handler for my feature for the theme in the plugin
add_action( 'init', 'apply_my_feature', 9 );
function apply_my_feature() {

	if ( ! get_theme_support( 'my-feature' ) ) {
		return;
	}

	// code for my feature
}
Enabling feature support for the theme in functions.php
add_action( 'after_setup_theme', function () {
	add_theme_support( 'my-feature' );
} );
The advantage of this approach is that if the plugin is not installed, the code in the theme will not trigger dependency errors, and no additional checks need to be written. You can also pass initialization parameters for the feature for a specific theme.
#2 Example of registering theme features
This code should be inserted into the theme's functions.php file.
// Register theme features
add_action( 'after_setup_theme', function(){

	// the ability to change the background from the admin panel
	add_theme_support( 'custom-background' );

	// the ability to change the images in the header from the admin panel
	add_theme_support( 'custom-header' );

	// enable the menu in the admin panel
	add_theme_support( 'menus' );

	// create a meta tag <title> via hook
	add_theme_support( 'title-tag' );

	// possibility to load a logo image in the admin panel
	add_theme_support( 'custom-logo', [
		'height'      => 190,
		'width'       => 190,
		'flex-width'  => false,
		'flex-height' => false,
		'header-text' => '',
	] );
}
Detailed description of each feature
post-formats
Allows specifying the format for a post.
The list of formats is fixed — you cannot add your own. Themes can support one, several, or all standard formats.
If the theme supports Post Formats, when creating a post, the user can choose a format (for example, "aside" or "video"). This affects how the post will be displayed.
post_class() will add a CSS class based on the format, for example: .format-video.
To allow support for only a few formats, list them in the second parameter:
add_action( 'after_setup_theme', function() {
	add_theme_support( 'post-formats', [ 'aside', 'gallery', 'video' ] );
} );
To check if a post belongs to a specified format, use the following code in single.php, page.php:
if ( has_post_format( 'video' ) ) {
	echo 'This is a video';
}
Supported formats:
| Format | Purpose |
|---|---|
| aside | A short post, usually without a title |
| gallery | A gallery of images |
| link | A link to an external site |
| image | A single image |
| quote | A quote, often inside <blockquote> |
| status | A short status, like a tweet |
| video | A video or video playlist |
| audio | An audio file or podcast |
| chat | Chat log: "Name: message" |
The post type when registering must also support formats, specified like this:
register_post_type( 'product', [
	'public'   => true,
	'supports' => [ 'title', 'editor', 'post-formats' ],
] );
Or like this:
add_post_type_support( 'page', 'post-formats' );
Learn more about post formats here
post-thumbnails
Allows setting a thumbnail for a post. Available since version 2.9. You can pass a second argument to the function as an array, specifying which post types to allow thumbnails for:
add_theme_support( 'post-thumbnails' );
add_theme_support( 'post-thumbnails', array( 'post' ) );          // Only for post
add_theme_support( 'post-thumbnails', array( 'page' ) );          // Only for page
add_theme_support( 'post-thumbnails', array( 'post', 'movie' ) ); // For post and movie types
This feature needs to be added before the init hook. This means the function should be located in the theme's functions.php file or through the after_setup_theme hook. For custom post types, you can also output the thumbnail block, see register_post_type().
To display the thumbnail in the theme file (index.php or single.php, etc.), use the the_post_thumbnail() function:
the_post_thumbnail();
To check if a post has a thumbnail before displaying it, use has_post_thumbnail():
if ( has_post_thumbnail() ) {
	the_post_thumbnail();
}
custom-background
Adds the ability to change the background from the admin panel. Available since version 3.4.
add_theme_support( 'custom-background' );
You can also specify parameters in the second argument:
$defaults = array(
	'default-color'          => '',
	'default-image'          => '',
	'wp-head-callback'       => '_custom_background_cb',
	'admin-head-callback'    => '',
	'admin-preview-callback' => ''
);
add_theme_support( 'custom-background', $defaults );
This will result in the head section of the site:
<style type="text/css" id="custom-background-css">
body.custom-background { background-color: #bdd96e; }
</style>
You can get the set background image using the get_background_image() function.
Compatibility with earlier versions
To ensure custom backgrounds are compatible with earlier versions (below 3.4), you can use the following condition:
global $wp_version;
if ( version_compare( $wp_version, '3.4', '>=' ) )
	add_theme_support( 'custom-background' );
else
	add_custom_background( $args );
custom-header
Since version 3.4, you can change header images from the admin panel using:
add_theme_support( 'custom-header' );
You can also specify additional parameters:
add_theme_support( 'custom-header', array(
	'default-image'          => '',
	'random-default'         => false,
	'width'                  => 0,
	'height'                 => 0,
	'flex-height'            => false,
	'flex-width'             => false,
	'default-text-color'     => '', // called by the get_header_textcolor() function
	'header-text'            => true,
	'uploads'                => true,
	'wp-head-callback'       => '',
	'admin-head-callback'    => '',
	'admin-preview-callback' => '',
	'video'                  => false, // since 4.7
	'video-active-callback'  => 'is_front_page', // since 4.7
) );
Video in the header (WordPress header)
With WP 4.7, header settings can allow video to be set, which will be used just like an image - for decorative purposes. Therefore, it will play automatically, loop, and be silent. This feature works well in combination with an image, so that the image loads first, and then, if video is supported, it loads.
Video support is enabled like this:
add_theme_support( 'custom-header', array(
	'video' => true,
) );
When this feature is activated in the customizer (theme settings), a block will appear where you can upload and set it.
All functions for outputting the header image and video:
-
get_header_image - Gets the URL of the header image. For outputting on the screen, there is a wrapper header_image().
-
get_header_image_tag() - Gets the <img> tag of the header image. Adds srcset and srcset attributes. For outputting on the screen, there is a wrapper the_header_image_tag().
-
has_header_video() – Checks if a video has been set in the customizer.
-
is_header_video_active() – Checks if the video should be displayed for the current request page on the front end.
-
get_header_video_url() – Gets the URL of the header video. It can be a local or external link to the video.
-
the_header_video_url() – Outputs the URL of the header video.
-
has_custom_header() – Checks if an image has been set for the theme header, or if a video has been set and is available for display on the current request page.
-
get_custom_header_markup() – Gets the HTML code for displaying the header image (does not include video).
- the_custom_header_markup() – Outputs the HTML code for displaying the header image and includes JS code for handling the header video if it is available for the current request.
Examples
First, in header.php where the header image is located, we should have the following code for the subsequent settings to work:
<img src="<?php header_image(); ?>" height="<?php echo get_custom_header()->height; ?>" width="<?php echo get_custom_header()->width; ?>" alt="" />
#1. Set a header image size: 980px by 60px:
add_theme_support( 'custom-header', array(
	'width'         => 980,
	'height'        => 60,
	'default-image' => get_template_directory_uri() . '/images/header.jpg',
) );
#2. Set a default image and allow users to change it ('uploads'=> true):
add_theme_support( 'custom-header', array(
	'width'         => 980,
	'height'        => 60,
	'default-image' => get_template_directory_uri() . '/images/header.jpg',
	'uploads'       => true,
) );
#3. Allow users to change the image sizes ('flex-width', 'flex-height'):
add_theme_support( 'custom-header', array(
	'flex-width'    => true,
	'width'         => 980,
	'flex-height'    => true,
	'height'        => 200,
	'default-image' => get_template_directory_uri() . '/images/header.jpg',
) );
#4. Set the text color for the header: parameter default-text-color
This example shows how to call the color changing in the theme settings. Where it is necessary to apply the color specified in the theme settings, use the function: get_header_textcolor() like this:
style="<?php echo sprintf( 'color: #%s;', get_header_textcolor() ); ?>"
automatic-feed-links
This feature adds links to RSS feeds for posts and comments in the head section of the HTML document. Works since version 3.0. It should be used instead of the deprecated function automatic_feed_links().
add_theme_support( 'automatic-feed-links' );
This will add similar links to the head section:
<link rel="alternate" type="application/rss+xml" title="Sample Site - Feed" href="http://example.com/feed/" />
<link rel="alternate" type="application/rss+xml" title="Sample Site - Comments Feed" href="http://example.com/comments/feed/" />
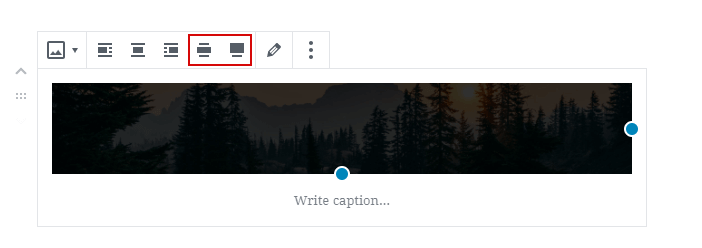
html5
Enables support for HTML5 markup for comment lists, comment forms, search forms, galleries, etc. Where markup needs to be enabled is specified in the second parameter:
add_theme_support( 'html5', array(
	'comment-list',
	'comment-form',
	'search-form',
	'gallery',
	'caption',
	'script',
	'style',
) );
If the second parameter is left empty, the following array will be used: array( 'comment-list', 'comment-form', 'search-form' ).
Since version 3.9, WordPress uses elements: <figure> (gallery) and <figcaption> (caption) for gallery code and for image captions.
Since WP 5.3, you can also specify script and style, then when inserting scripts and styles using various WP functions, the attribute type will not be output:
<script type="text/javascript">
<style type="text/css">

<!-- html5 -->
<script>
<style>
menus
Enables support for navigation menus - the admin page /wp-admin/nav-menus.php:
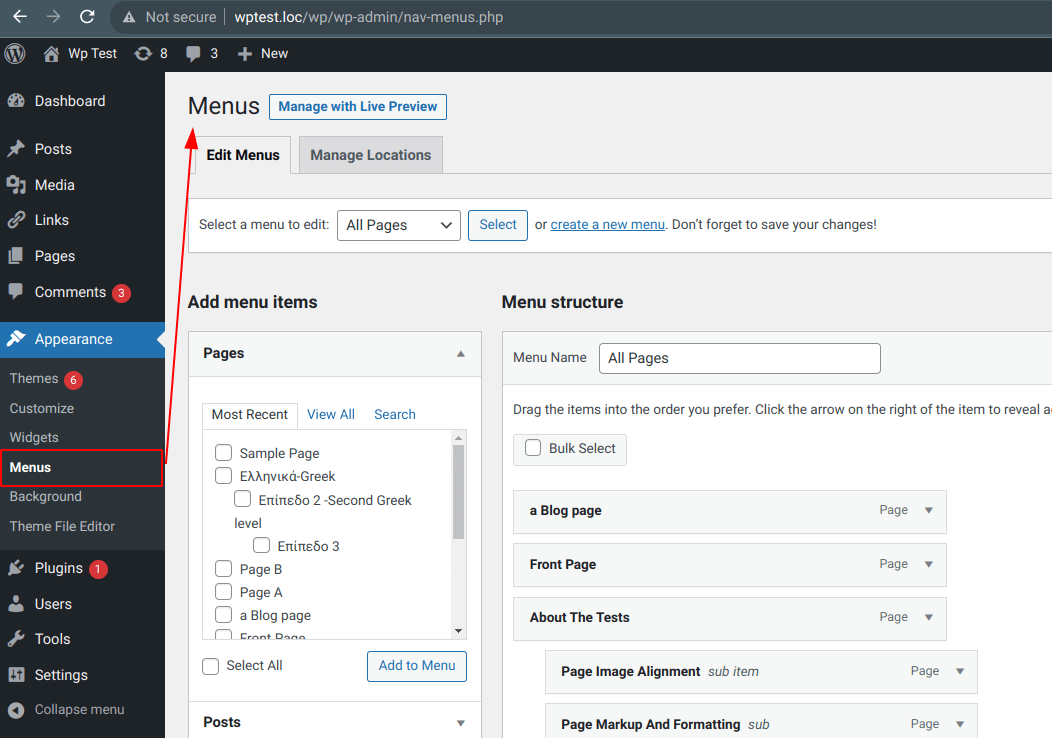
add_action( 'after_setup_theme', function(){

	add_theme_support( 'menus' );
} );
This feature is used only for reading via the current_theme_supports() function.
Enabling this feature separately makes sense only if you need to create a navigation menu and not attach it to any menu area, but output it directly by id (menu name). For example, you can enable this feature separately in the admin panel, after which access to the menu creation page will appear, create a menu there and output it in the template directly via id.
In all other cases, this feature is automatically enabled when registering navigation menu areas through the functions:
title-tag (WP 4.1)
Since version 4.1. This function allows plugins and themes to change the <title> meta tag. This feature will be used instead of wp_title().
add_theme_support( 'title-tag' );
If this option is activated for the theme, then there is no need to set the <title><?php wp_title() ?></title> meta tag in the theme - it will be automatically included via the wp_head hook. Here is the code that is responsible for the inclusion (from the file /wp-includes/general-template.php).
function _wp_render_title_tag() {
	if ( ! current_theme_supports( 'title-tag' ) ) {
		return;
	}

	echo '<title>' . wp_get_document_title() . '</title>' . "\n";
}
Additionally, with this option enabled, the wp_title function will append the site name to the end of titles, and on the homepage, the site description at the end of the title (a piece of code from the wp_title() function):
...
	if ( current_theme_supports( 'title-tag' ) && ! is_feed() ) {
		$title .= get_bloginfo( 'name', 'display' );

		$site_description = get_bloginfo( 'description', 'display' );
		if ( $site_description && ( is_home() || is_front_page() ) ) {
			$title .= " $sep $site_description";
		}

		if ( ( $paged >= 2 || $page >= 2 ) && ! is_404() ) {
			$title .= " $sep " . sprintf( __( 'Page %s' ), max( $paged, $page ) );
		}
	}
...
To change titles, use filters:
- pre_get_document_title – allows completely rewriting the behavior of the wp_get_document_title() function.
- document_title_separator – allows changing the separator between title parts.
- document_title_parts – allows changing individual parts of the title, passed as an associative array.
Disabling 'title-tag'
To disable this feature, remove the filter:
add_action( 'wp_head', function(){
	remove_theme_support( 'title-tag' );
}, 0);

// or
add_action( 'wp_head', function(){
	remove_action( 'wp_head', '_wp_render_title_tag', 1 );
}, 0);
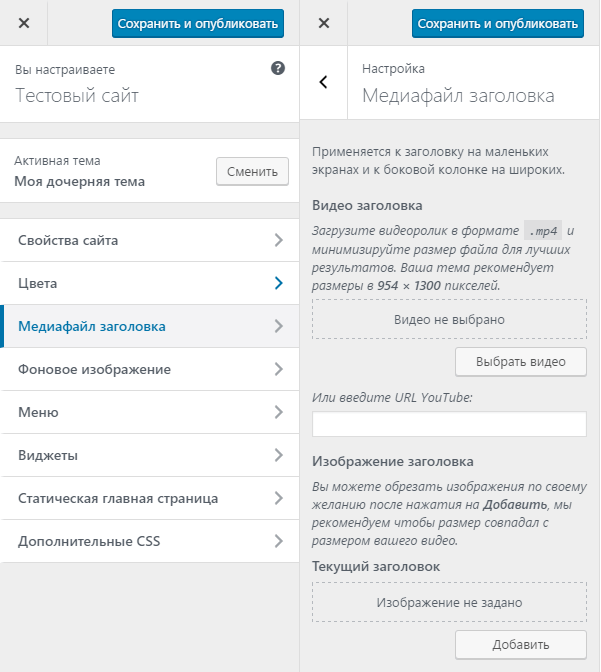
custom-logo (WP 4.5)
Adds the ability to upload a logo image in the theme settings in the admin panel.
![]()
After setting such a logo, it can be retrieved and displayed in the theme using the get_custom_logo() or the_custom_logo() functions.
To check for the presence of such a logo, use has_custom_logo().
Example definition:
add_theme_support( 'custom-logo', [
	'height'      => 190,
	'width'       => 190,
	'flex-width'  => false,
	'flex-height' => false,
	'header-text' => '',
	'unlink-homepage-logo' => false, // WP 5.5
] );
Since version 5.5, you can also specify the unlink-homepage-logo parameter. When enabled, the link to the homepage will be removed from the logo image if we are on the homepage. The alt attribute of the image will also be cleared on the homepage.
customize-selective-refresh-widgets (WP 4.5)
Enables "Selective Refresh" support for widgets in the customizer. What "Selective Refresh" is, see in this demo video and read (in English) here and here.
add_theme_support( 'customize-selective-refresh-widgets' );
starter-content (WP 4.7)
Extends the starter content (the content that is set when installing WordPress or a theme).
By default, WP has its own starter content, but it can be supplemented by specifying all content data in this feature. What data can be specified and in what format, see in the code of the get_theme_starter_content() function.
Usage template:
add_theme_support( 'starter-content', array(
	'options'     => '', // site options
	'theme_mods'  => '', // theme options
	'widgets'     => '', // widget data
	'nav_menus'   => '', // menu data
	'attachments' => '', // attachment data
	'posts'       => '', // array of arrays: ID => array('post_type' => '', 'post_title' => '', 'post_excerpt' => '', 'post_name' => '', 'post_content' => '', 'menu_order' => '', 'comment_status' => '', 'thumbnail' => '', 'template' => '')
) );
Example of setting starter content (taken from core function):
admin-bar
This feature is enabled by default and can be disabled with the hook:
add_filter( 'show_admin_bar', '__return_false' );
Through get_theme_support( 'admin-bar' ), WP retrieves the name of the callback function _admin_bar_bump_cb(), which outputs CSS styles for the top HTML margin for the admin bar.
To remove/disable this margin, use the following code:
add_theme_support( 'admin-bar', [ 'callback'=>'__return_false' ] );
align-wide (WP 5.0 Guten)
Enables support for wide alignment for images in Gutenberg blocks.
add_theme_support( 'align-wide' );
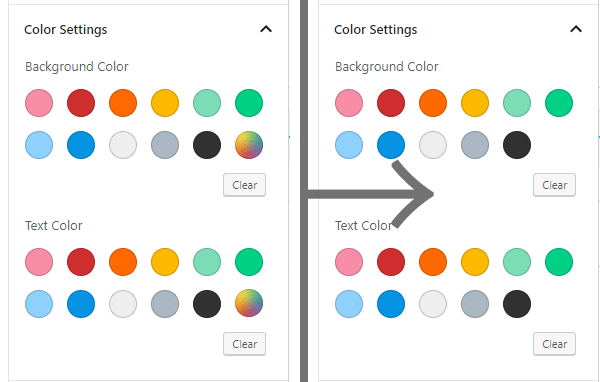
editor-color-palette (WP 5.0 Guten)
Defines your own collection of colors that can be used when editing blocks.
Let's look at an example. Define your own color collection:
add_theme_support( 'editor-color-palette', [
	[
		'name'  => __( 'strong magenta', 'domain' ),
		'slug'  => 'strong-magenta',
		'color' => '#a156b4',
	],
	[
		'name'  => __( 'light grayish magenta', 'domain' ),
		'slug'  => 'light-grayish-magenta',
		'color' => '#d0a5db',
	],
	[
		'name'  => __( 'very light gray', 'domain' ),
		'slug'  => 'very-light-gray',
		'color' => '#eee',
	],
	[
		'name'  => __( 'very dark gray', 'domain' ),
		'slug'  => 'very-dark-gray',
		'color' => '#444',
	],
] );
This will appear in the block editor:

Next, in CSS on the front end, you need to describe the following styles:
.has-strong-magenta-background-color {
	background-color: #313131;
}

.has-strong-magenta-color {
	color: #f78da7;
}
disable-custom-colors (WP 5.0 Guten)
By default, the color palette offered to blocks allows users to choose any color (different from the colors of the editor or theme).
If you need to restrict users in color selection, you can disable the color selection function with:
add_theme_support( 'disable-custom-colors' );
This flag ensures that users can only choose colors from the editor palette provided by the theme or from the default editor colors if the theme did not provide them.
editor-font-sizes (WP 5.0 Guten)
Defines your own collection of text sizes that can be used when editing blocks.
Let's look at an example. Define your own size collection:
add_theme_support( 'editor-font-sizes', [
	[
		'name'      => 'My Small',
		'shortName' => 'S',
		'size'      => 12,
		'slug'      => 'small'
	],
	[
		'name'      => 'My Regular',
		'shortName' => 'M',
		'size'      => 16,
		'slug'      => 'regular'
	],
	[
		'name'      => 'My Large',
		'shortName' => 'L',
		'size'      => 20,
		'slug'      => 'large'
	],
	[
		'name'      => 'My Larger',
		'shortName' => 'XL',
		'size'      => 24,
		'slug'      => 'larger'
	]
] );
This will appear in the block editor:

Next, on the front end in CSS styles, you need to describe the size like this:
.has-regular-font-size {
	font-size: 16px;
}
Read more in a separate article (in English).
editor-gradient-presets (WP 5.4 Guten)
WordPress 5.4 allows your theme to specify gradient presets for the background of blocks and buttons.
Some blocks have the option to choose predefined gradients from a list. The block editor provides standard gradient presets, but the theme can overwrite them and provide its own. This is done like this:
add_theme_support(
	'editor-gradient-presets',
	[
		[
			'name'     => __( 'Vivid cyan blue to vivid purple', 'domain' ),
			'gradient' => 'linear-gradient(135deg,rgba(6,147,227,1) 0%,rgb(155,81,224) 100%)',
			'slug'     => 'vivid-cyan-blue-to-vivid-purple'
		],
		[
			'name'     => __( 'Vivid green cyan to vivid cyan blue', 'domain' ),
			'gradient' => 'linear-gradient(135deg,rgba(0,208,132,1) 0%,rgba(6,147,227,1) 100%)',
			'slug'     =>  'vivid-green-cyan-to-vivid-cyan-blue',
		],
		[
			'name'     => __( 'Light green cyan to vivid green cyan', 'domain' ),
			'gradient' => 'linear-gradient(135deg,rgb(122,220,180) 0%,rgb(0,208,130) 100%)',
			'slug'     => 'light-green-cyan-to-vivid-green-cyan',
		],
		[
			'name'     => __( 'Luminous vivid amber to luminous vivid orange', 'domain' ),
			'gradient' => 'linear-gradient(135deg,rgba(252,185,0,1) 0%,rgba(255,105,0,1) 100%)',
			'slug'     => 'luminous-vivid-amber-to-luminous-vivid-orange',
		],
		[
			'name'     => __( 'Luminous vivid orange to vivid red', 'domain' ),
			'gradient' => 'linear-gradient(135deg,rgba(255,105,0,1) 0%,rgb(207,46,46) 100%)',
			'slug'     => 'luminous-vivid-orange-to-vivid-red',
		},
	]
);
- name
- A readable label (shown above) that appears in the tooltip and provides users with a description of the gradient. This is important for those using screen readers or having difficulty perceiving color.
- gradient
- CSS gradient value applied to the block's background image. Detailed information about acceptable types of gradients can be found in the Mozilla documentation.
- slug
- A unique ID for the gradient and is used to generate CSS classes used by the block editor.
Themes are responsible for creating classes that apply gradients. Thus, to apply the gradient vivid-cyan-blue-to-vivid-purple, the theme needs to create the following class:
.has-vivid-cyan-blue-to-vivid-purple-gradient-background {
	background: linear-gradient( 135deg, rgba(6,147,227,1) 0%,rgb(155,81,224) 100% );
}
Disabling custom gradients
Themes can disable the ability to set custom gradients with the following code:
add_theme_support( 'disable-custom-gradients' );
When set, users will be restricted to the default gradients provided in the block editor or the gradients provided via the editor-gradient-presets theme support setting.
After setting this code, users will only have the gradients provided in the Block Editor by default, or the gradients specified in the editor-gradient-presets option.
disable-custom-font-sizes (WP 5.0 Guten)
Themes can disable the ability to set custom font sizes with the following code:
add_theme_support( 'disable-custom-font-sizes' );
Now, users will be limited to the default sizes set in Gutenberg, or the sizes provided through the theme support editor-font-sizes.
editor-styles (WP 5.0 Guten)
Enables an option that connects custom style files for the block editor. Such styles are added to the global variable $editor_styles by the add_editor_style() function.
Do not confuse with editor-style (no s at the end), which is activated by calling the add_editor_style() function and is not used for the TinyMCE editor.
In the classic editor, the CSS style file is loaded in the WYSIWYG editor iframe unchanged. Gutenberg does not use iframes, and to ensure that your styles apply only to the editor content, styles are automatically modified: certain CSS selectors are rewritten. This also allows Gutenberg to use your editor styles in the preview of block variations.
For example, body { ... } will turn into .editor-styles-wrapper { ... }. This means that you do not always need to rely on the names of editor classes directly.
Also read: How to set the content width in Gutenberg
Step 1:
Enable the output of custom styles for the block editor and add your style file to the list of files to be included (see add_editor_style()):
# Enable the output of custom styles for the block editor
add_action( 'after_setup_theme', 'gutenberg_setup_theme' );
function gutenberg_setup_theme(){
	// style file for the block editor
	add_theme_support( 'editor-styles' ); // enables support
	add_editor_style();                   // adds the editor-style.css file
}
Step 2:
Now, you need to create a file named style-editor.css in the root of the theme and write styles for the editor there:
/* Code for the `style-editor.css` file */

body {
	background-color: #eee;
	color: #333;
}

/* change the width of the block editor */

/* Main width */
.wp-block {
	max-width: 820px;
}

/* Width for "wide" blocks */
.wp-block[data-align="wide"] {
	max-width: 1080px;
}

/* Width for "full-wide" blocks */
.wp-block[data-align="full"] {
	max-width: none;
}
You can assign widths corresponding to your theme. You can use any units: % or px.
The location and name of the added file can be changed, for example like this:
add_editor_style( 'css/wp-block-styles.css' );
In this case, the specified file will be included from the parent and/or child theme.
It is not recommended to change the editor styles too much so that they look correct in the classic editor as well.
dark-editor-style (WP 5.0 Guten)
This is an addition to editor-styles.
If the editor style is based on a dark background, you can add the following to adjust the user interface color to work on a dark background:
add_theme_support( 'editor-styles' ); // required for the next line to work
add_theme_support( 'dark-editor-style' );
wp-block-styles (WP 5.0 Guten)
Basic styles for block editors are always connected when the editor is enabled. This is done through a built-in WP hook and the wp_common_block_scripts_and_styles() function:
add_action( 'wp_enqueue_scripts', 'wp_common_block_scripts_and_styles' );

// in the wp_common_block_scripts_and_styles() function, the following code is called
wp_enqueue_style( 'wp-block-library' );
If you enable this option like this:
add_theme_support( 'wp-block-styles' );
Then, in addition to the basic block styles, a theme styles file will be included.
if ( current_theme_supports( 'wp-block-styles' ) ) {
	wp_enqueue_style( 'wp-block-library-theme' );
}
As a result, the following style file will be added to the HEAD on the front end:
<link rel='stylesheet' id='wp-block-library-theme-css' href='http://dh5.com/core/wp-includes/css/dist/block-library/theme.min.css?ver=5.1' type='text/css' media='all' />
Here are the styles in this file /wp-includes/css/dist/block-library/theme.css:
responsive-embeds (WP 5.0 Guten)
Embed blocks automatically apply styles to embedded content to reflect the aspect ratio of the content embedded in an iFrame. A block with responsive styles with specified proportions will look like this:
<figure class="wp-embed-aspect-16-9 wp-has-aspect-ratio">...</figure>
To resize content while maintaining its aspect ratio, the <body> element requires the class wp-embed-responsive. It is not set by default, and this function needs to be enabled with the following code:
add_theme_support( 'responsive-embeds' );
core-block-patterns (WP 5.5)
This property is enabled by default at a very early stage (even before the mu_plugin_loaded event) and is responsible for registering patterns for blocks.
Pattern registration occurs at the init event:
add_action( 'init', '_register_core_block_patterns_and_categories' );
Such a pattern is used in the parameter register_block_pattern().
An example of such a pattern is wp-includes/block-patterns/two-images.php.
If you are not using the block editor on the site, you can cancel the registration of patterns:
remove_theme_support( 'core-block-patterns' );
widgets-block-editor (WP 5.8)
This feature enables the block editor for "Widgets". The option is enabled by default on the hook:
add_action( 'after_setup_theme', 'wp_setup_widgets_block_editor', 1 );

function wp_setup_widgets_block_editor() {
	add_theme_support( 'widgets-block-editor' );
}
Disabling the block editor for widgets
Option 1
To disable the block editor, you need to remove theme support:
# Disables the block editor for WordPress widgets
remove_theme_support( 'widgets-block-editor' );
Option 2
To disable the block editor on the widgets page, you can use the special hook use_widgets_block_editor:
# Disables the block editor for WordPress widgets
add_filter( 'use_widgets_block_editor', '__return_false' );
block-templates (WP 6.1)
add_action( 'after_setup_theme', 'add_block_templates_support' );

function add_block_templates_support() {
	add_theme_support( 'block-templates' );
}
Support for block-templates is automatically enabled since WP 6.1 if one of the functions returns true: wp_is_block_theme() or wp_theme_has_theme_json().
The code from the core:
// File: wp-includes/default-filters.php
add_action( 'after_setup_theme', 'wp_enable_block_templates', 1 );

// file: wp-includes/theme-templates.php
function wp_enable_block_templates() {
	if ( wp_is_block_theme() || wp_theme_has_theme_json() ) {
		add_theme_support( 'block-templates' );
	}
}
block-template-parts (WP 6.1)
This feature is relevant only for themes that are not block-based, as block-based themes already support block-based template parts as part of the site editor.
Allow administrators to edit parts of the site using blocks.
By default, it is disabled; to enable it, you need to add the following code:
add_action( 'after_setup_theme', 'add_block_template_part_support' );

function add_block_template_part_support() {
	add_theme_support( 'block-template-parts' );
}
The template part editor does not allow creating or deleting existing template parts. This is because the theme must include the template part in the PHP template.
For more about template parts: https://developer.wordpress.org/themes/templates/template-parts/
Also read: https://gutenberg.10up.com/reference/Themes/block-template-parts/
disable-layout-styles (c WP 6.1)
The option allows you to refuse the generated layout styles of blocks, which create standard structural styles for the main blocks: Group, Columns, Buttons, and Social Icons.
The following code disables the generation of standard layout styles, including margins and alignment.
add_theme_support( 'disable-layout-styles' );
When enabled, structural styles for the correct display of some blocks must be specified in the theme for both the frontend and the editor in the admin panel.
Layout classes (for example, .is-layout-flex, .is-layout-constrained) may continue to be added to blocks, but without corresponding styles.
See also:
- See code: WP_Theme_JSON::get_layout_styles()
- blockGap
link-color (WP 6.3)
This option works only if there is no theme.json file in the current and parent theme! See wp_theme_has_theme_json()
Enables the global "link color" option.
add_theme_support( 'link-color' );
Where this option is located: /wp-admin/site-editor.php?p=/styles§ion=/colors:

Themes with theme.json
For themes where theme.json exists, this setting is enabled by default. To disable it, you need to specify in theme.json:
{
	"settings": {
		"color": {
			"link": false
		}
	}
}
appearance-tools (WP 6.5.0)
WP_Theme_JSON::APPEARANCE_TOOLS_OPT_INS — includes a set of styling tools: margin, border, typography, colors, etc.
add_theme_support( 'appearance-tools' );
border (WP 6.3.0)
Includes support for managing borders (thickness, color, style) for blocks.
add_theme_support( 'border' );
custom-line-height
Allows changing line height in blocks.
add_theme_support( 'custom-line-height' );
custom-spacing
Includes support for adjusting spacing (margin, padding) in blocks.
add_theme_support( 'custom-spacing' );
custom-units
Allows the use of custom measurement units (px, em, rem, vh, % etc.) in block settings.
add_theme_support( 'custom-units' );
disable-custom-gradients
Disables the ability to select or create custom gradients.
add_theme_support( 'disable-custom-gradients' );
editor-spacing-sizes (WP 6.6.0)
Adds support for preset spacing sizes in the editor.
add_theme_support( 'editor-spacing-sizes' );
featured-content
Allows the theme to mark posts as "featured content" for special display.
add_theme_support( 'featured-content' );
widgets
Includes support for classic widgets (Appearance → Widgets).
add_theme_support( 'widgets' );
Notes
- Global. Array.
$_wp_theme_features
Changelog
| Since 2.9.0 | Introduced. |
| Since 3.4.0 | The custom-header-uploads feature was deprecated. |
| Since 3.6.0 | The html5 feature was added. |
| Since 3.6.1 | The html5 feature requires an array of types to be passed. Defaults to 'comment-list', 'comment-form', 'search-form' for backward compatibility. |
| Since 3.9.0 | The html5 feature now also accepts 'gallery' and 'caption'. |
| Since 4.1.0 | The title-tag feature was added. |
| Since 4.5.0 | The customize-selective-refresh-widgets feature was added. |
| Since 4.7.0 | The starter-content feature was added. |
| Since 5.0.0 | The responsive-embeds, align-wide, dark-editor-style, disable-custom-colors, disable-custom-font-sizes, editor-color-palette, editor-font-sizes, editor-styles, and wp-block-styles features were added. |
| Since 5.3.0 | The html5 feature now also accepts 'script' and 'style'. |
| Since 5.3.0 | Formalized the existing and already documented ...$args parameter by adding it to the function signature. |
| Since 5.4.0 | The disable-custom-gradients feature limits to default gradients or gradients added through editor-gradient-presets theme support. |
| Since 5.5.0 | The core-block-patterns feature was added and is enabled by default. |
| Since 5.5.0 | The custom-logo feature now also accepts 'unlink-homepage-logo'. |
| Since 5.6.0 | The post-formats feature warns if no array is passed as the second parameter. |
| Since 5.8.0 | The widgets-block-editor feature enables the Widgets block editor. |
| Since 5.8.0 | The block-templates feature indicates whether a theme uses block-based templates. |
| Since 6.0.0 | The html5 feature warns if no array is passed as the second parameter. |
| Since 6.1.0 | The block-template-parts feature allows to edit any reusable template part from site editor. |
| Since 6.1.0 | The disable-layout-styles feature disables the default layout styles. |
| Since 6.3.0 | The link-color feature allows to enable the link color setting. |
| Since 6.3.0 | The border feature allows themes without theme.json to add border styles to blocks. |
| Since 6.5.0 | The appearance-tools feature enables a few design tools for blocks, see WP_Theme_JSON::APPEARANCE_TOOLS_OPT_INS for a complete list. |
| Since 6.6.0 | The editor-spacing-sizes feature was added. |
| Since 7.0.0 | The html5 feature's 'script' and 'style' arguments are deprecated and unused. |